Even though the Eddy sensor makes a bed mesh that is accurate enough for Klipper to print a perfect first layer by compensating for a bed that is neither flat nor level, I was planning to shim under the front screws on the frame that mounts the bed to the Z axes, but Gergo just posted a video that shows a more precise method of leveling the Zero bed, that’s not much more difficult. You should watch Gergo’s video so you have an overview of the process before getting into the weeds, below.

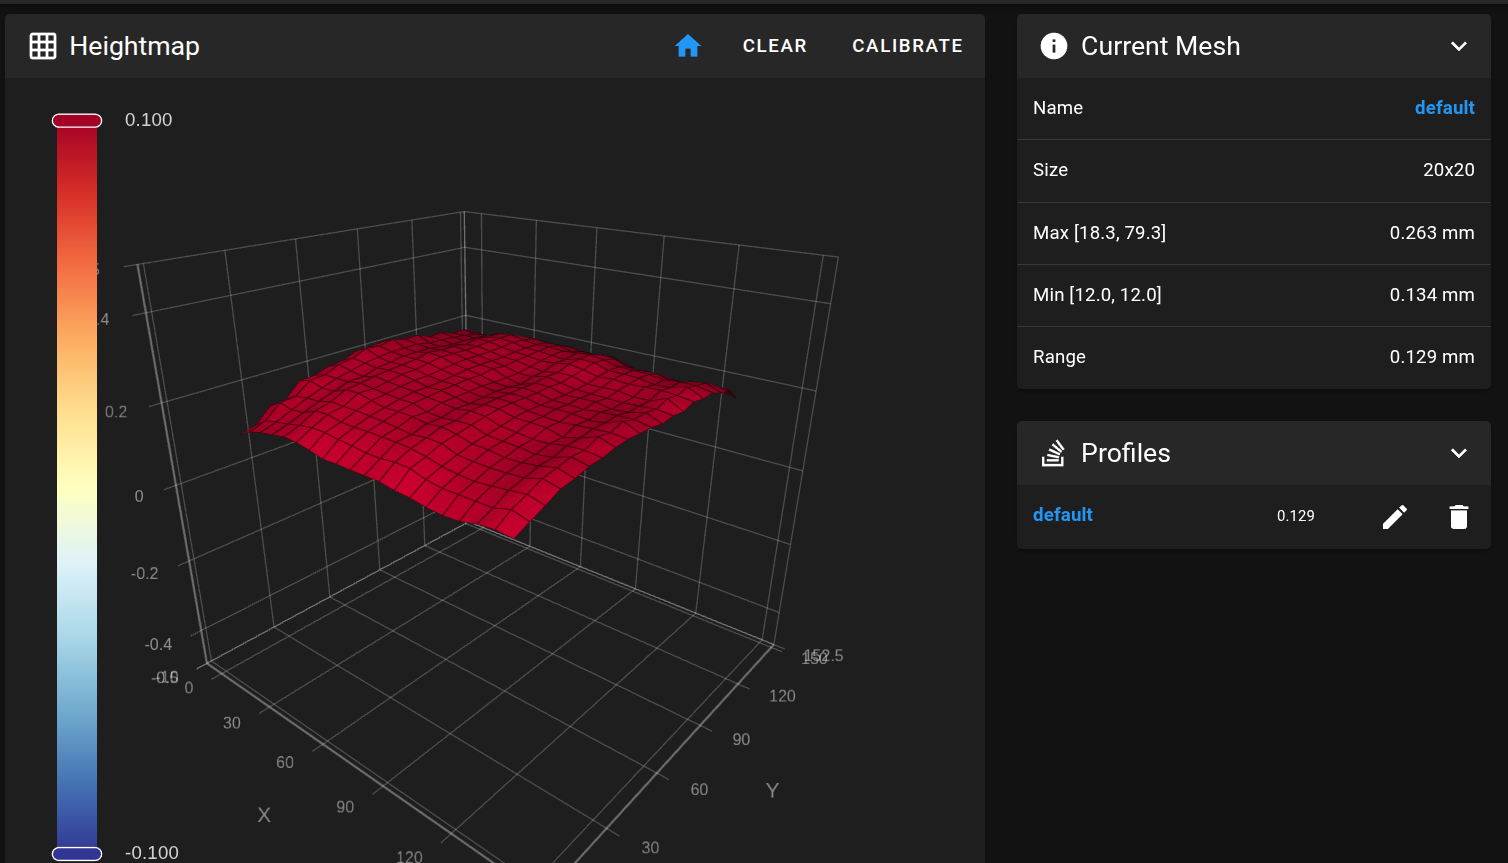
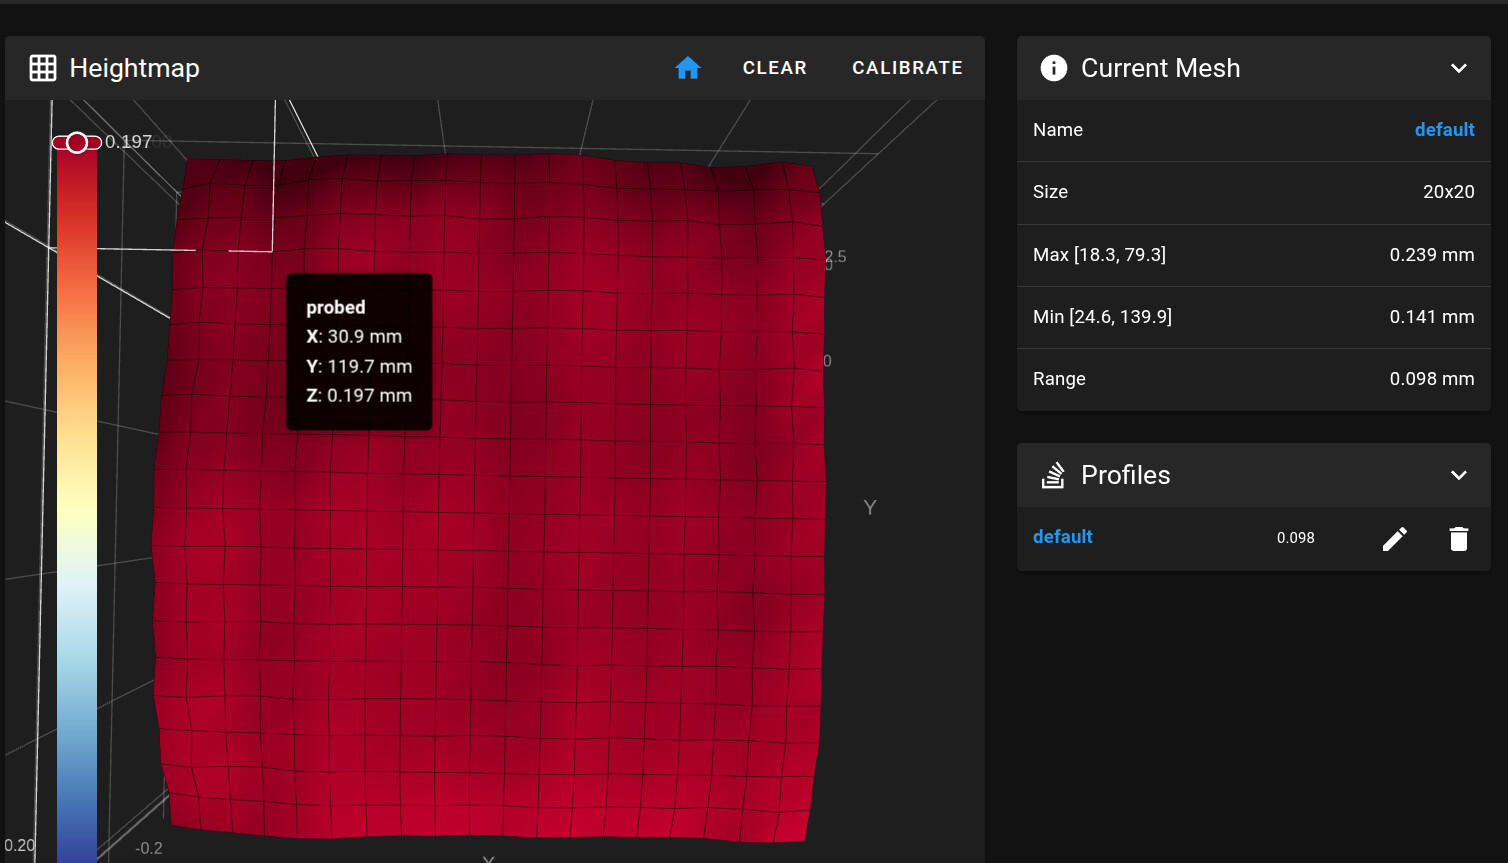
Here is my Zero’s bed mesh, as shipped by Sovol:

I got this from the Mainsail web interface, by clicking HEIGHTMAP on the left, then CALIBRATE.
The bed is level from left to right but droops 0.313 mm in the front, so I need to shorten the back spacers a bit less than 0.3 mm - less than the total range because the standoffs are inset from the corners where the extreme range is measured. I shortened them 0.2 mm. They were 8.5 mm and I sanded them to be 8.3 mm.

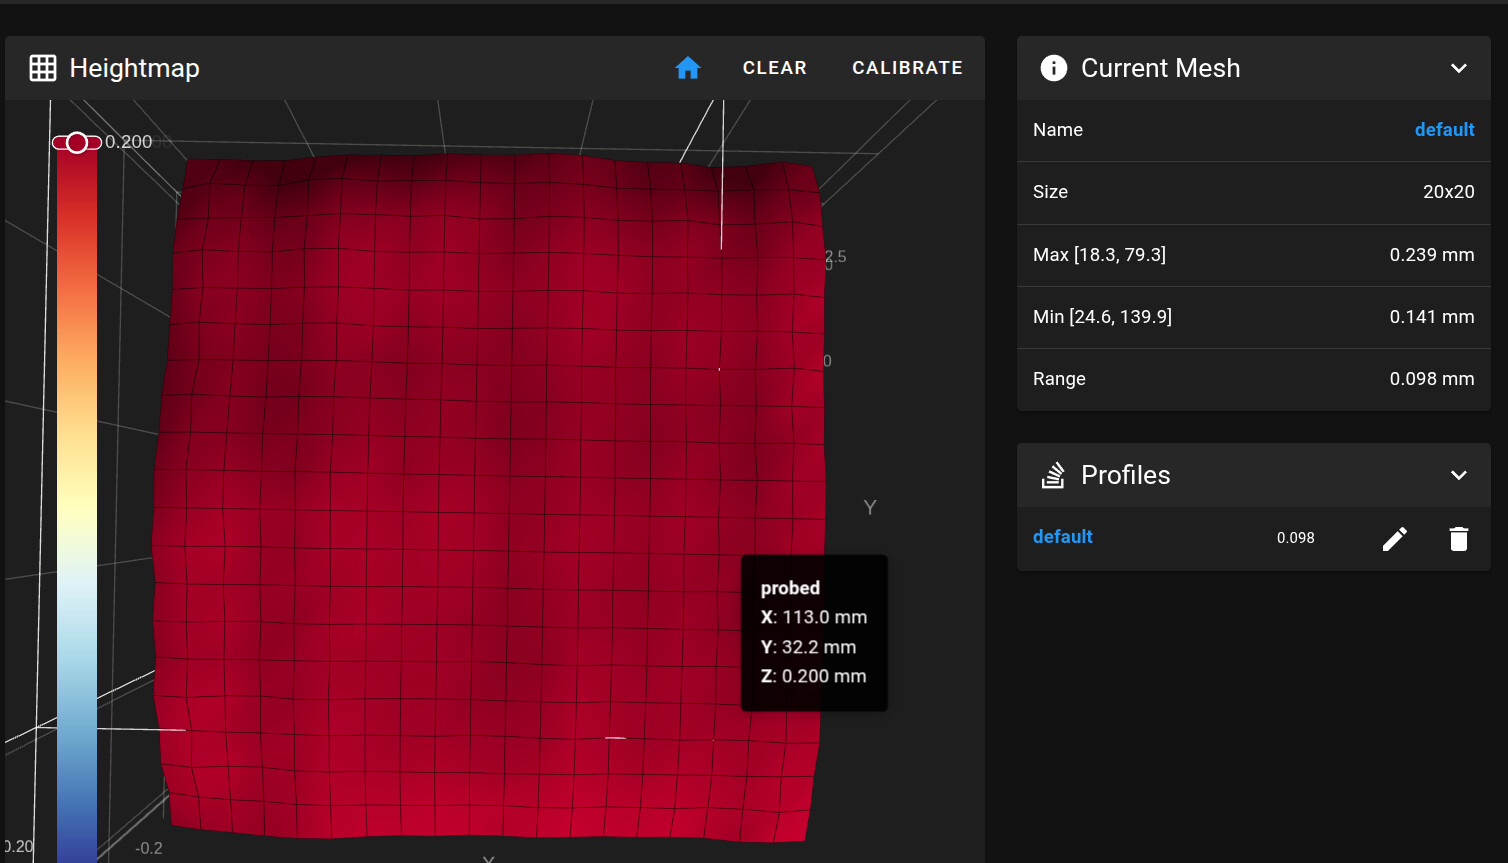
I reassembled the bed and ran another bed mesh.

A range of 0.180 mm is considerably improved but I could do better.
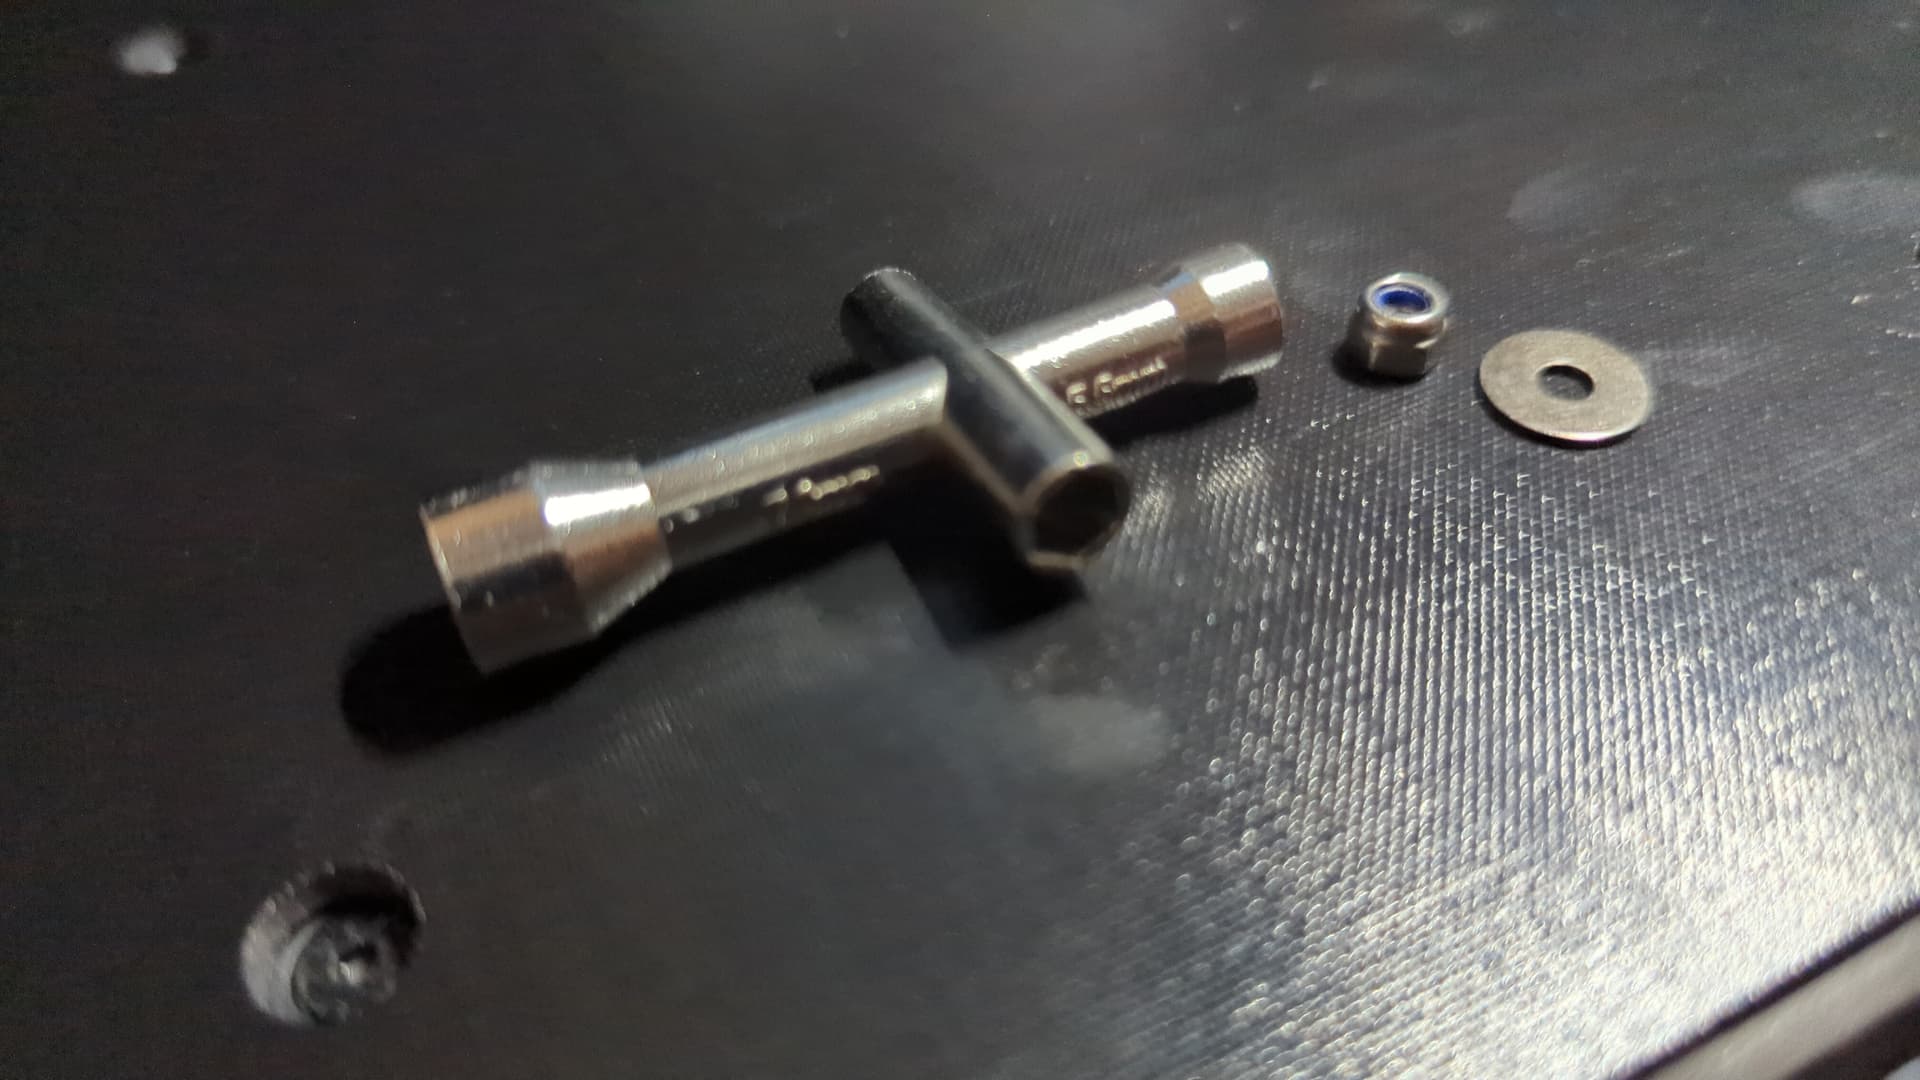
By the way, one of the small cross wrenches sold for 3D printer repair was handy for the nut below the bed on the front left screw at X = 30, Y = 30.
I sanded the high spots of the magnetic plate, vacuumed off the debris, scrubbed the surface with a clean towel and isopropyl alcohol, and ran another bed mesh.

0.145 mm. I’m slowly creeping up on it. You don’t want to go too far and remove more material than is needed. A little more sanding…

0.138 mm. Closer. More sanding…
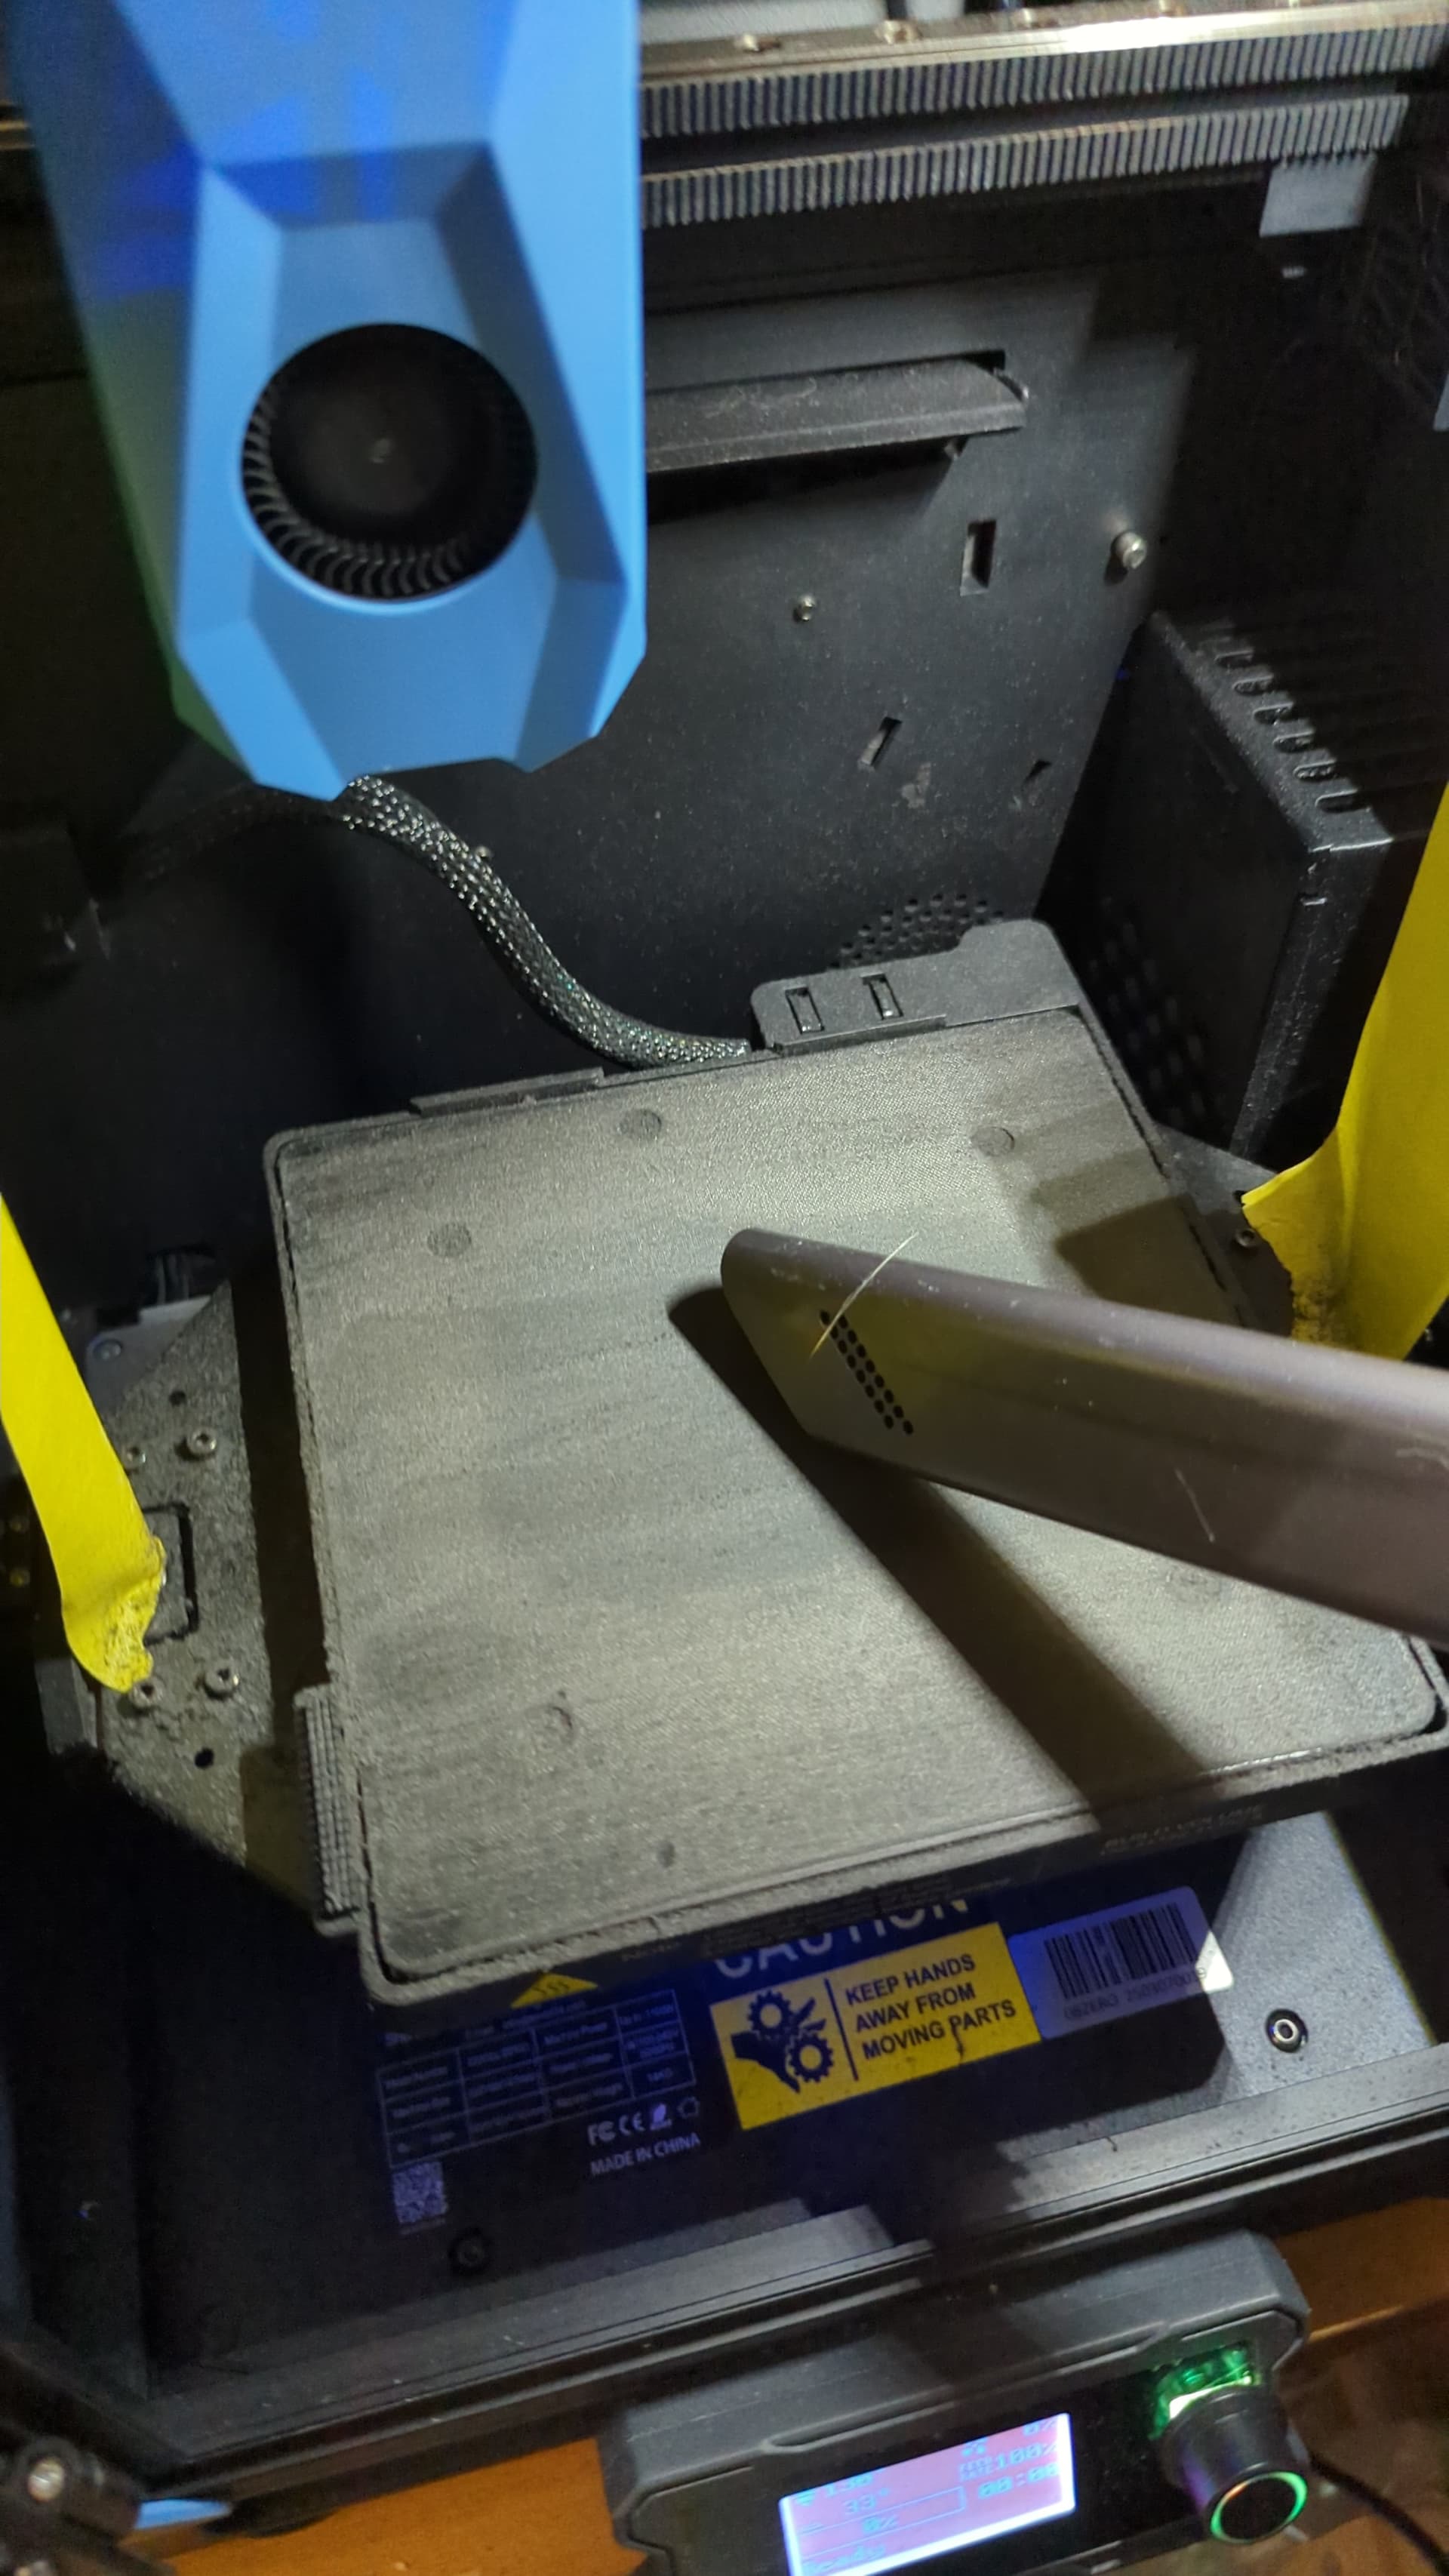
0.129 mm. Closer. More sanding. I vacuumed the bed and inside the printer after each sanding. Note the yellow tape to protect the Z axis lead screws from the sanding debris. I only taped the front of the screws. There is no need to completely cover the screws because the tape would be very difficult to remove and this is a slow iterative process with a lot of taping, sanding, vacuuming, alcohol wiping, removing the tape, reinserting the steel build plate (VERY IMPORTANT), and running another bed mesh. After sanding, I thoroughly wiped the bed surface with a clean towel and alcohol to remove the embedded debris that remained after vacuuming. That’s important because vacuuming only gets the large loose debris.

The range is down to 0.114. More sanding.

The range is now 0.090 mm. Under 0.1 mm is definitely good enough. I should stop here, but I still see that I can make it flatter, so, more sanding…

The bed is now flat and level to within 0.082. Great. I should stop there, but why not make it as good as it can be? In for a penny, in for a pound. Almost there. More sanding…
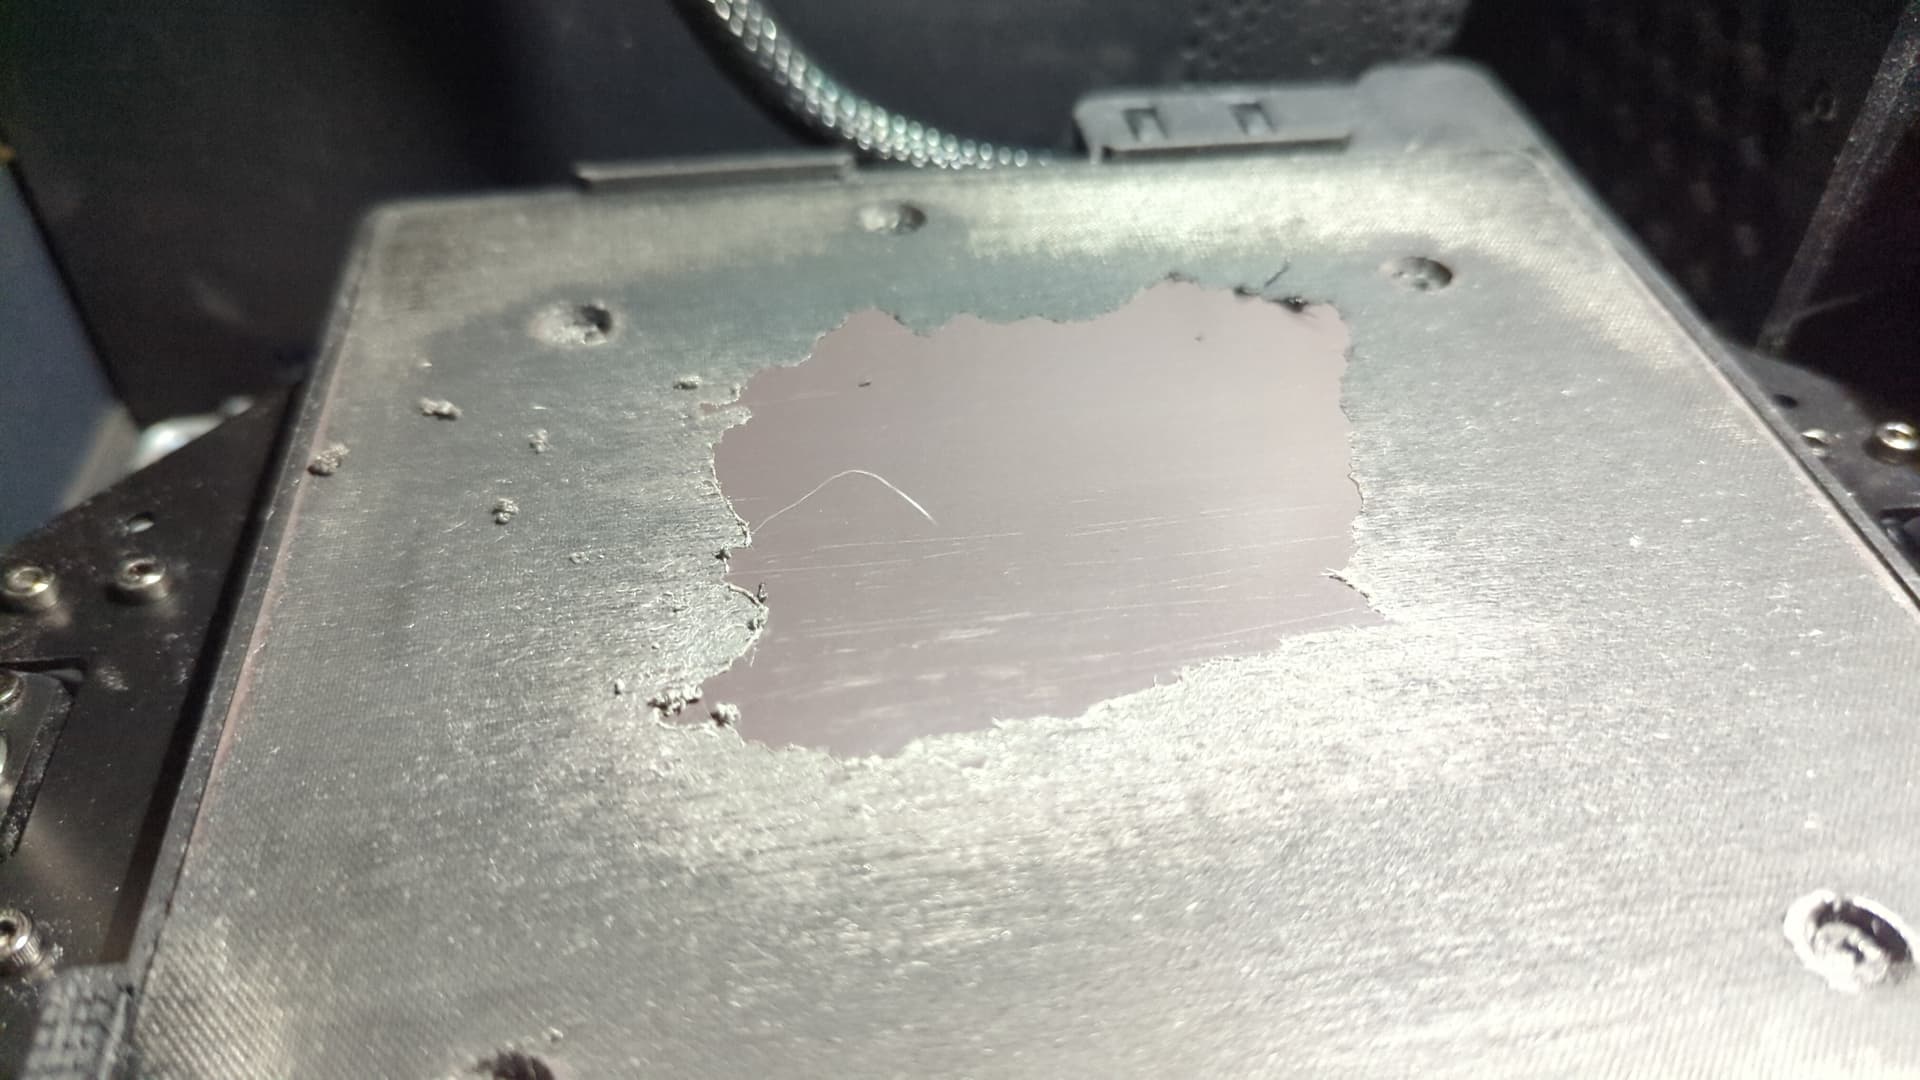
What the…? I’ve been sanding a cloth rubber sticker. I thought it was some premium magnetic sheet, but it was a rubber sheet that Sovol uses on top of the magnetic sheet for a premium look and maybe more traction so the build plate doesn’t shift. I sanded a hole in the center and the edges of that hole cause the build plate to warp terribly, so I need to rub all of the rubber sticker off to get to the actual magnetic sheet beneath it. 25 minutes later, I’m rolling the last of the sticker off the back right edge of the magnetic sheet.

Time for another bed mesh to see how flat and level the magnetic sheet is, after I removed the sticker that I had meticulously sanded.

The range on the bed’s magnetic sheet is 0.142. As expected, I’m pretty much back to where I was before I sanded the rubber sheet. Viewed from the side, the high spot is a ridge running in the center of the bed from left to right, a bit higher on the left side.

After sanding the plastic bed spacers per Gergo’s video, some fine adjustment can be made to the four mounting points by slight adjustments to the screw tension. The bed mesh shows the height above the four mounting points, 30 mm in X and Y inside from the corners. My four mounting points are all within 10 microns and that’s within the real world Eddy measuring tolerance.


After more sanding, I made the bed flat to within 0.084 mm.

It’s weird sanding a magnetic sheet because it makes rubbery magnetic debris that sticks to the magnetic sheet and steel surfaces, which is why it’s important to do a thorough alcohol wipe and buff until the towel is no longer picking up the black debris. The sanded magnetic sheet shows the horizontal stripes where it was magnetized.

I sanded a bit more and got the range to 0.071 mm.

I’m calling that done, before I screw up something else.
Now, theoretically, the bottom of the printed part is flat and parallel to the top printed surface to less than 0.1 mm, which is an accuracy worthy of the solid little Zero.
