I don’t much like textured PEI. I much prefer smoother build surfaces for making precision parts such as Creality’s smooth PEI and epoxy build plates. Does anyone know of any other build plates for the Zero or have a good method to cut bigger ones to fit? Has anyone tried using a sticker or garolite sheet on the stock build plate? Did it cause any issue with the auto bed leveling?
You can try this:
Thanks! I was thinking of trying to cut a plate using tin snips but mine often leave a curled lip at the edge of a cut. But I’ve also got a dremel and I think some of the fragile cutoff discs left and may give it a go with that. Just realized I’ve got a couple very old plates in rough shape that I only use with glue or ABS slurry which I could practice on to see what method works best.
Got a plate half cut and broke my last cutoff disc. Got a supposedly better EZ506HP cutoff disc in my shopping cart but waiting to add something else for free shipping. Has anyone tried plates for other printers such as the Ender 2, KP3S or A1 mini and used them without cutting just letting them overhang the bed?
I got a smooth build plate for a K3P or K3PS, 180mm x 180mm. It is a square cut plate without cuts for alignment keys. It is working fine on my zero overhanging in the front but with plenty of clearance to the door and overhanging on the right with a little clearance to the Z screw. It is a bit more effort to place the plate with acceptable alignment but with a little practice I get it right on most attempts.
Something I came across.
Wham Bam sells plates for the Ender 2, which is 165x165. Not an exact fit for the Zero, but closer than A1 Mini plates at 180x180
Textured PEI, Smooth PEI, Smooth PEX, and Polycarbonate
I’m expecting my Zero this coming week. I’ve got a handful of A1 Mini plates, but if that’s too awkward, I will prob look to get a Wham Bam PEX plate.
Zero has pegs both at the front and back of the bed base for aligning the build plate. If the replacement build plate doesn’t fit in between those then it will not sit level. Additionally there’s the brush on the left side so there’s not much space sideways either for even a slightly oversized build plate.
No, not exact, but surpisingly close.
The Zero bed is 162mm wide, and 162mm from the inside of the rear locator insets to the front locator.
The Ender 2 bed is 165x165, the back of the plate is square. So, you could cut 3mm insets slightly off center to keep the left edge clear of the nozzle brush. Or, you could just cut down the front locator tab on the bed, which IMO is hella pointless anyway, and just slap the Ender 2 build plate on it, aligning it to rear and left.
I’ve been using an over sized plate that overhangs in front with no issue so far although I have only done smaller prints on it with nothing close to the front of the bed. Also the plate I got was $7 and quite thin and flexible and perhaps a better stiffer plate might not work as well.
I’m really leaning toward cutting down the front locator tab. It really doesn’t do anything useful.
I’m inclined to agree. Having two tabs on the front sides of the build plate is useful when the build plate is 350x350 or 500x500, but I don’t want to grab a 165x165 build plate with both hands. My inclination is to grab the front center tab, which the Sovol Zero build plate doesn’t have.
Having a raised tab in the center of the bed to align the build plate makes no sense unless you attach the build plate starting at the front. Who does that? I tried on the Zero and that raised tab doesn’t work for alignment because there is a 10 mm gap between the sides of the raised tab and the cutout for the build plate tabs on each side, so that raised tab isn’t aligning anything. Apparently it’s only there to prevent using the less expensive 165x165 mm build plates for the Ender 2, Adventurer 3, LuzBot Mini 2, etc. I just bought two 165x165 textured PEI build plates on Amazon for under $16 on Amazon Prime Day.
If you aren’t printing on the front 30 mm of the build plate, the Zero would probably do a bed scan without crashing with the front tab on a build plate resting on top of the center tab on the bed, but I’m almost certainly going to level that tab even with the top of the magnetic surface, probably when I remove the print bed to shim the front edge so my Zero doesn’t always have a bed mesh that tilts downward in the front, indicating a build plate that’s not co-planar with the coreXY gantry. At least the build plate is flat, so Klipper still makes perfect first layers by compensating with the Eddy probe bed mesh.
Just for fun…
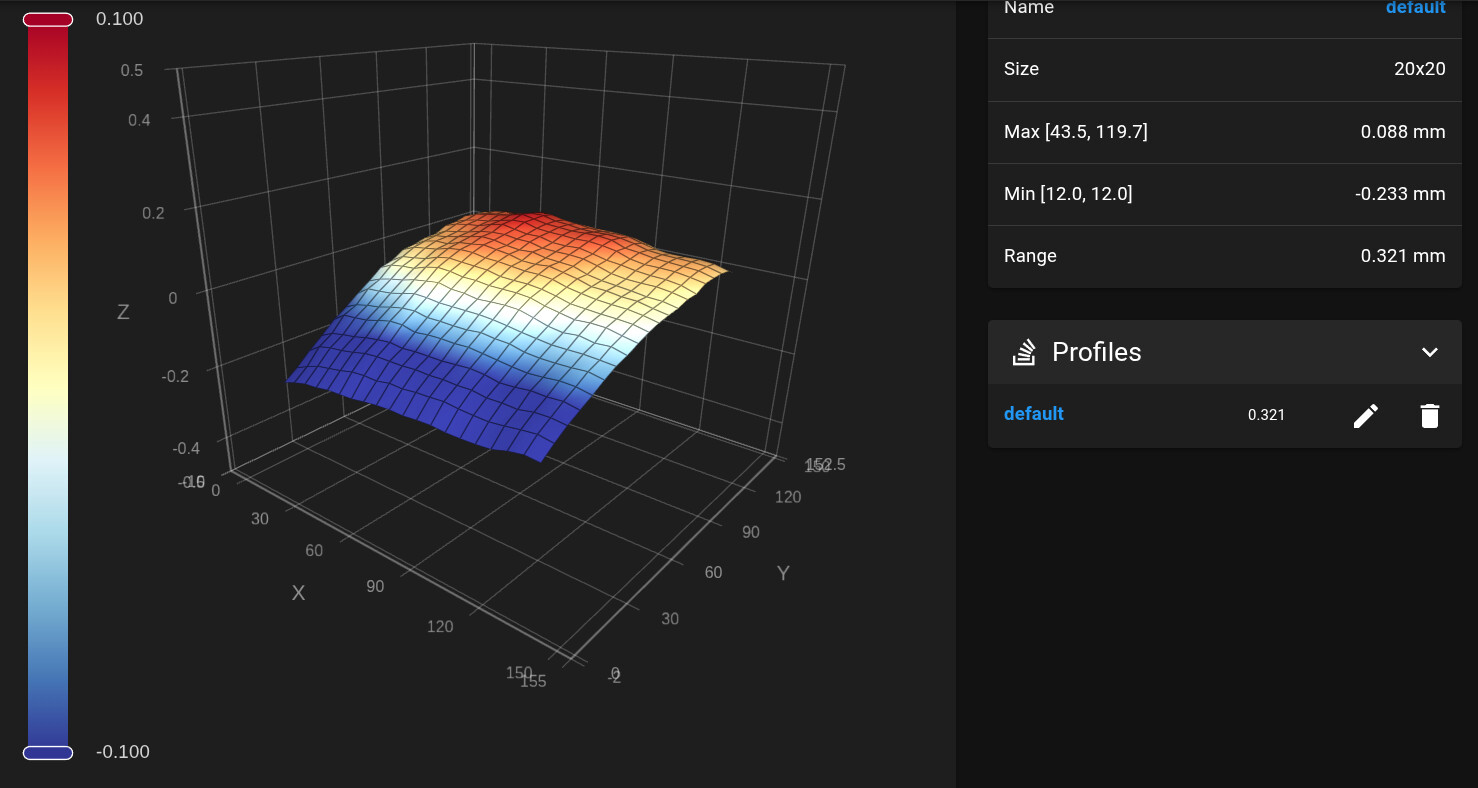
Here is my bed mesh with the Sovol build plate.
Here is the bed mesh with the 165x165 mm gold textured build plate installed with the front center tab resting on the raised tab on the Zero’s bed.
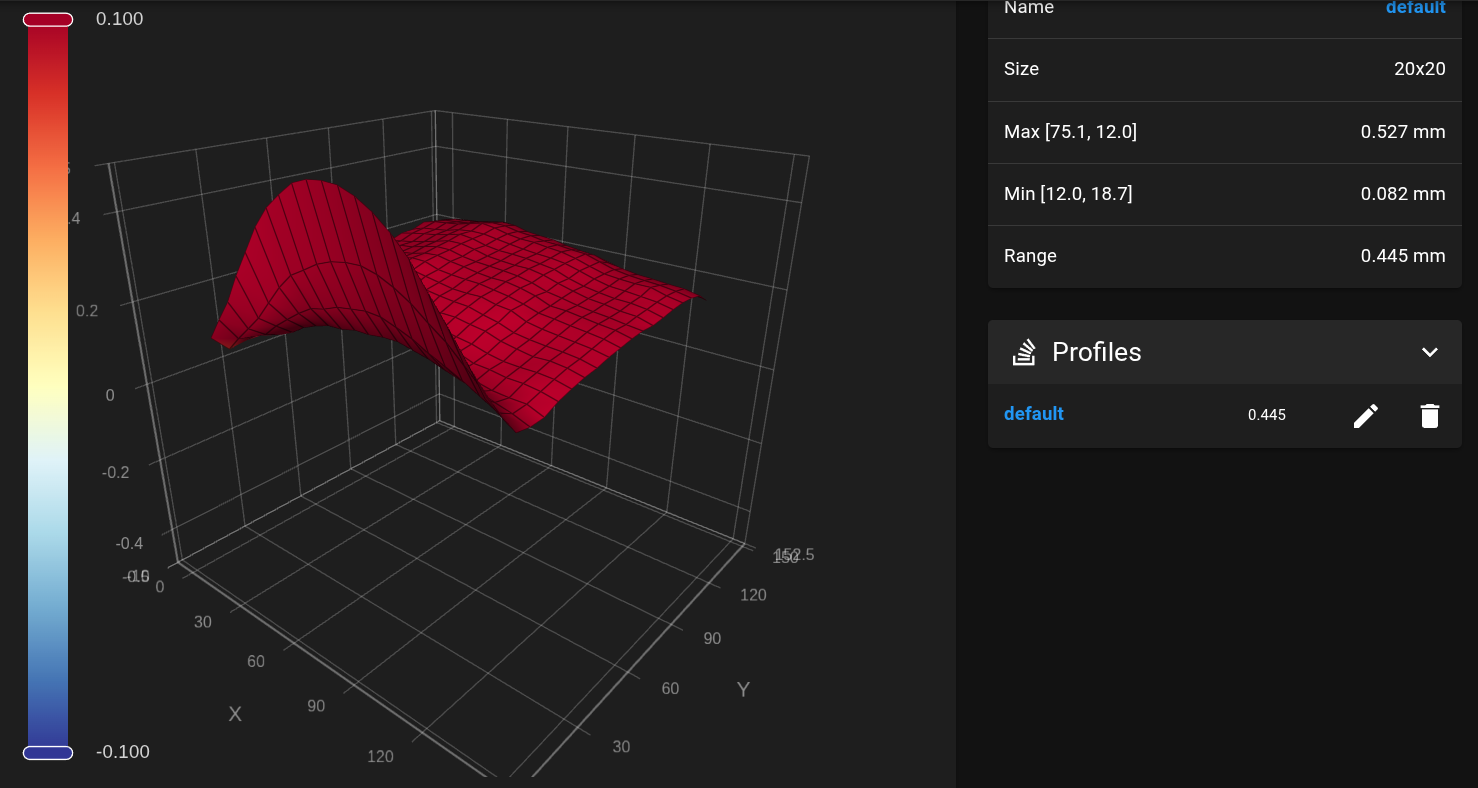
Yikes! That looks terrible, but looking at the range, 0.445 mm isn’t that much worse than 0.321 mm.
Here is the side view of the bed mesh.
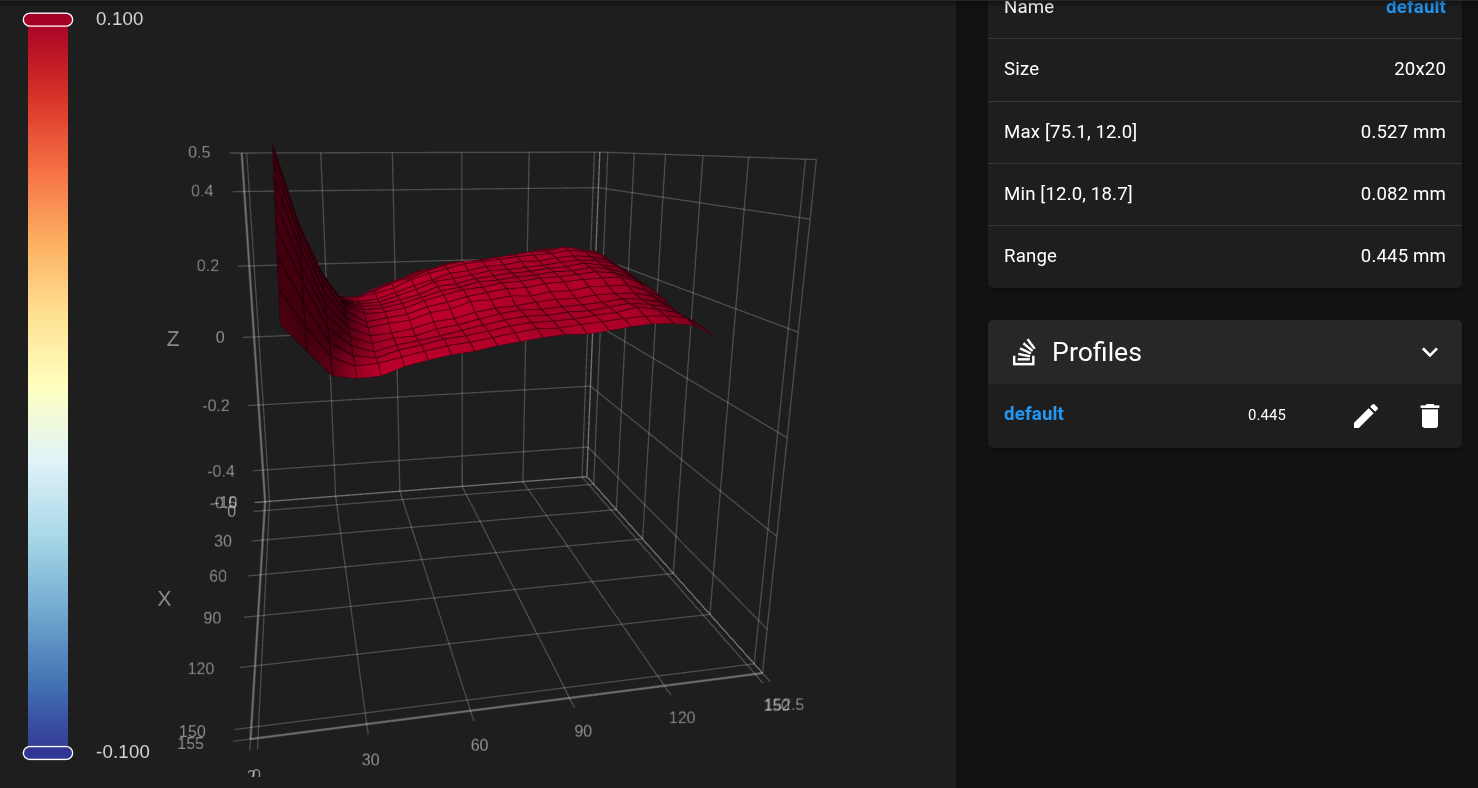
The extreme rise is only in the very front where the build plate is resting on the bed’s raised tab, with the magnetic sheet pulling the build plate into place not far from the raised tab. I’m not going to print on this, but I could.
I’ll trim the raised tab on the bed when I shim it to raise the front until it’s level.
My bed droops a bit at the front also, though not as much as yours. I also have a very slight drop to the left, which I could fix by slipping one of the Z shafts by a tooth, just not sure if I want to deal with that.
I think companies like BIQU see the 165x165 mm size as being used on older printers such as the Ender 2, Adventurer 3 and LuzBot Mini 2 and they don’t want to invest in producing a product for printers that few people are upgrading anymore. They didn’t get the memo that the Zero is making small printers cool again. It’s a shame, because I’d love to have a low temperature and/or smooth 165x165 mm build plate that fits my Zero.
I sent a request to Wham Bam to make plates for the Zero. They have what is probably the largest number of printers supported, so I figured they were the best shot. But like any other company, they are only going to do it if they get enough demand. But to know if there’s a demand, you have to tell them.
Good idea. I just sent an online form email to Wham Bam asking for Zero build plates.
I did the same when I 1st received my Zero.
The thing that might have hurt the situation is the Zero stopped shipping for awhile.
I am reluctant to do things not easily reversible that might result in unexpected trouble. But in this case like you I could not see any point in the front locator tab and decided to test nibbling at one corner of the plastic tab with my sharpest pair of flush/side/wire cutters and found it cut easily and cleanly enough to proceed. After maybe another hundred snips and roughly 5 minutes of effort the tab is gone and I can now happily use the full y axis with my oversized plate. It did take some care to cut the tab without impacting the edge of the magnetic bed but there is a bit of clearance making it possible.
I hadn’t thought about using cutters. That really seems like the better choice, instead of throwing plastic particles all over…
I ordered a couple of Ender 2 sized plates (165x165) from Wham Bam today. They’ve got the plate with a smooth PEI sheet pre-installed on sale at $14 right now. I also ordered a PEX sheet to stick to the other side of one of them.