I’ve been wanting to print PPA-CF since seeing it tested in a My Tech Fun YouTube video. My Zero is supposed to arrive tomorrow and I’d like to know if there is anything I should do other than swapping in a larger hardened nozzle before attempting to print abrasive filaments?
I saw that video also…
Dry it first, overnight…like 12 hours.
I would add a brim or use glue, the bed can be finicky.
Use the printer first for a week or so, get used to it before you change the nozzle & try the PPA-CF…JMO
Thanks for the suggestions. Though I am most concerned about whether any other parts of the printer such as extruder hobbed gears are not rated for abrasive filaments?
Although Nylon isn’t listed as an approved filament, I don’t think it would be an issue.
You can always ask @sovol3d or send an email to info@sovol3d.com
Sovol’s product page does say
Supported Filament: PLA, PETG, TPU, PETG-CF, ABS, ASA, PA, PC
and one of the images also has PLA-CF listed so at least I’d expect also other similar abrasive filaments to be supported.
Yes! Thank you! I missed that or had forgotten I saw it before ordering the printer as that was a rather long time ago.
Did you print PPA-CF? Did it work well?
I use a 0.6 mm Microswiss CM2 hardened steel sleeved nozzle for almost everything now because it can print carbon fiber filaments but it also prints the common materials very well. It’s my Do It All nozzle.
If wear on the extruder gears are a concern, maybe use one of the core carbon fiber materials that has the abrasive fiber on the inside and no abrasive fibers on the outside of the filament.
Haven’t done the PPA-CF yet. I’ve got nozzles ordered but have not yet bought the PPA-CF. I’ll first be trying some PET-CF I’ve got on hand. But now I’ve got to fix a clogged hot end, my first on this printer. I tried printing ASA today and think it jammed due to heat creep into the heat break. Chamber temp was about 45 C. I thought I could let it go up to 50C but am just guessing. Done for now, will hopefully find disassembly tips and fix it tomorrow.
I had one bad Zero nozzle jam with PETG. I mistakenly let the chamber drift up to 60 C and had heat creep, then made it worse by getting in a hurry. I’ve been 3D printing forever and definitely knew better. I eventually got it cleared and it’s been good ever since. I still print ABS-CF with a chamber temperature of 60 F but I’ll be much more careful with PETG.
I posted a BAD CLOG thread that may have some info that could help you. People posted very good and helpful info.
Good luck. Please let us know how your carbon fiber reinforced nylon printing goes.
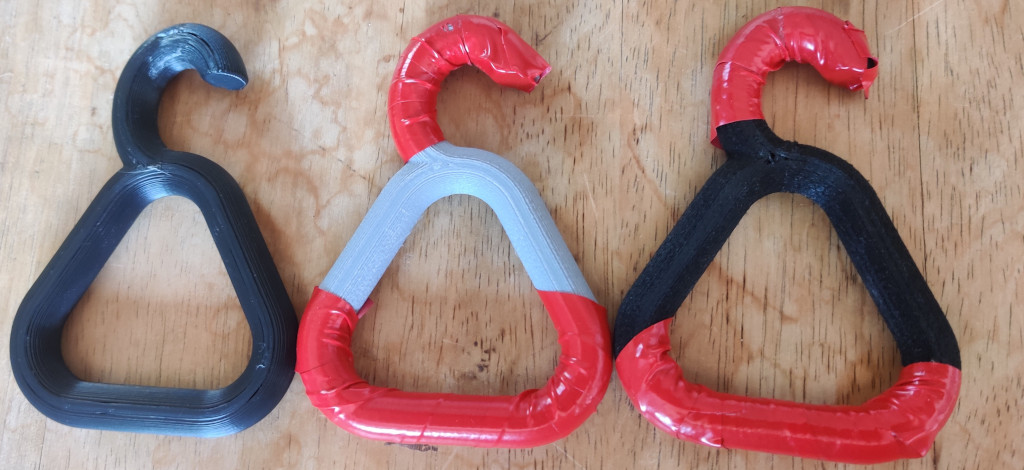
I’ve got skylights with a steel ring instead of flip out handles for cranking them open and shut. These are sized for two fingers through the triangle and the hook through the ring on the skylight crank. From left to right they were printed in old wet budget black PLA as a test fit sample and then newly opened without drying rolls of Elegoo gray glass fiber PETG and black carbon fiber PAHT also described as PPA-CF although likely inferior to the PPA-CF in My Tech Fun’s test videos.
This was my first time printing fiber filaments and it went fairly well. It took me a try or two with each filament to get an acceptable first layer followed by these completed prints. I expect print quality could be further improved by rounds of calibration test prints but these are acceptable to me and sufficient for purpose although the task is not extremely demanding and most any filament might suffice with a bit of care. Drying for several hours before first use is recommended although the very tight vacuum sealed packages suggested it might work ok immediately and neither print struck me as much impacted by filament wetness.
The parameters for the CF print were: bed 100 C, nozzle 280 C, 0.2mm layer height, 0.75mm line width, flow 5 mm3/s, 2 walls, 3 floors & ceilings on stock textured PEI with Sovol’s sample glue stick and a $2.50 hardened bimetal 0.6mm nozzle. The filament was $40/kg from elegoo.com (also sells for $350/10 kg). Most PPA-CF I’ve seen sells at $60 to $100 / kg and could be better but I like to get experience with lower cost options first.
I wrapped the contact surfaces of the two fiber prints with electrical tape as they felt quite abrasive. In the future I will likely design anything using these filaments to have separate parts for touch surfaces printable in non fiber filaments.
I subjectively tested these with the hooks clamped in a bench vise and the fiber prints are noticeably stiffer than the PLA by the amount of force needed to make them flex. I typically achieve needed strength and stiffness in parts by designing things sufficiently large or dense but in cases where space is constrained such as replacing broken parts in commercial devices having filaments with an expanded range of physical properties is nice.
I still haven’t printed nylon or carbon fiber reinforced nylon on my Zero but it’s so good at printing other engineering filaments that I’m eager to try it so thanks for sharing your method and results.
Instead of electrical tape, I’d probably 3D print some TPU-LW covers. ![]() For the open hook end, Heat shrink tubing or a heat shrink cap would be fast and easy. Epoxy, Plastidip or spray paint are other options.
For the open hook end, Heat shrink tubing or a heat shrink cap would be fast and easy. Epoxy, Plastidip or spray paint are other options.
I’m a fan of My Tech Channel. Igor has me wanting to anneal parts like these for greater strength and improved layer adhesion.
Functional parts like these to repair things or replace lost things is why I 3D print. A Zero and FreeCAD is a powerful combination. It’s my geek super power.
Yes, the electrical tape is not pretty or robust, just the quickest fix. I’ll explore better options with new projects in these filaments. Something I think would work for these hand cranks are my printed TPU straps/bands which I use for tons of things. I could spiral wrap the both the triangle and hook with a thin stretchy strap and I’ve got a print in place clamping buckle for securing those straps printable/functional down to very tiny sizes one of which could hide nicely under the base of the hook.
I started doing CAD with Fusion360 but got annoyed with frequent updates, changes to their free licenses, being forced to use cloud storage/sharing and began using FreeCAD. FreeCAD became my go to for several years but now I mostly use OpenSCAD. It is more challenging/limited in some ways to FreeCAD but I find it much better for reusing and customizing previous designs such that now I can often do bigger projects much quicker. With FreeCAD my old designs of significant complexity often became difficult and time consuming to reuse as they would break in painful ways when changed. Some problems were no doubt caused by my lack of expertise but I felt like FreeCAD offered too many inadequately documented ways to do things in sub-optimal fashion that seemed ok at first but later became disasters.
I use regular 95A TPU for structural parts. We tend to think of TPU as the flexible filament and it is, when printed with 1-3 perimeters and low percentage infill, but print it with 6+ perimeters or solid and it’s very structural and extremely impact resistant. The layer adhesion is so strong that FDM printed parts have nearly isotropic strength. Layer adhesion is not a problem. A solid TPU part won’t flex to any macroscopic degree but it’ll be a solid part that won’t break. I printed TPU mud flaps and battery cover for my 4WD Japanese mini truck. Solid TPU might be a great choice for your skylight handles. The biggest issue would be stringing and bridging, which are weak points for TPU, but you might be able to alter the geometry to be functional but TPU friendly.
I used OpenSCAD before FreeCAD. Even though I’ve written a lot of code, I was initially put off because it seemed tedious to write code to describe part geometry but after playing around with OpenSCAD it quickly became much easier. I was surprised by that. It’s particularly good for repetitious design elements or complex symmetry. If I wanted to design a flower pot that had a sinusoidal cross section that precessed with Z height to make an interesting visual complexity, OpenSCAD would be a great way to go. I’m surprised someone hasn’t made websites that have some canned OpenSCAD designs for lamp shades, lamp globes, flower pots and other objects, with a web based front end that allowed a person to change parameters on a website to generate their own unique semi-custom designs and then click the BUY button to have it printed and shipped. That sort of playing in OpenSCAD and then seeing the part rendered was almost addictive.
I used FreeCAD from the start, and it definitely earned it’s < 1 version number in the pre-release years. It wasn’t ready for prime time, had bugs galore, and crashed often. Still, I suffered through and was relatively happy to have an open source CAD solution, buggy as it was. I grew accustomed to saving often, and saving different versions at each level because future design changes could break when trying to alter an earlier design parameter. With version 1.0, FreeCAD suddenly became a lot better. It’s not Solidworks, but it’s now very usable for my design needs. The only time making a change breaks something is when I shorten something and there is no longer enough material for subsequent chamfer or fillet operations that now run into each other, and that’s not a fatal crash. It generates an error, can’t recompute the object, and I can then change subsequent operations until the part can be recomputed without error. If you haven’t tried FreeCAD in the last year or two, it might be worth another look.
Someone should make a TinkerCAD Mode FreeCAD tutorial video. I tried to urge a couple of YouTubers who make “real CAD” FreeCAD videos but they apparently aren’t interested. There is a huge demand for easy to use CAD from people who want to make stuff and don’t want to be CAD technicians, and TinkerCAD has capitalized on that very well, but most people, including FreeCAD users, still don’t realize that it’s possible to ignore 98% of the features of FreeCAD and still have a surprisingly capable and very easy to learn CAD system. The Part workbench simplifies things but I don’t know why there isn’t an EZCAD or Beginner workbench that has only the basic features so new users can be immediately productive without being forced to find the few features they need among a dizzying array of deluxe CAD features. It’s amazing what can be done with only icons for Cube, Cylinder, Sphere, Cone, Tube, and Torus primitives, Union, Cut and Intersection Boolean operators and Chamfer and Fillet edge operators. Once comfortable with those and how FreeCAD operates in the Part workbench, it’s easy to add more capabilities as needed. Serious CAD operators want all of the deluxe features and seem to think it’s wrong to teach people to use the crippled version of FreeCAD to be immediately productive, perhaps fearing they’ll become dependent on using a crutch, but I think trying to make everyone into a professional CAD operator when most people only want to CAD a skylight handle is a disservice to most people.
I used fiber filament for this part because the hook needs stiffness to turn the skylight cranks. This done in tpu might be indestructible but would be about as useful as a tpu crowbar.
I do use tpu for functional, structural parts where some flex is desirable such as the corners of my Zero’s drybox. I chose tpu in this case to protect the bag from being torn but the flexibility also makes the frame rugged.

you know those plastic bags are permeable to water vapor, right?
I’m using freezer grade ziplocks so whatever vapor is passing through the bags is likely a tiny fraction of what comes in with the air leaking in through the bowden tubes and the gaps between the tubes and bags. But it works for me. I use them with bags of desiccant which contain a small percentage of color changing beads. In the dog days of summer I might need to swap in a new desiccant bag weekly in each dry box and in winter they last much longer. At least with most filaments. With very moisture sensitive filaments such as nylon I tend to unload the filament when I’m done printing for the day.