Using SV06+ USB port with pronterface

Hi there,

Has anybody used pronterface with the SV06 plus? I’m trying to test my extruder fan, but there’s no way in the SV06 plus’ menus (that I can see - please correct me if I’m wrong).

So I figured I’d use pronterface to send fan commands. I hooked the printer up to my computer and it appears to see the device, showing up as COM5 “USB-SERIAL CH340”.

When I open pronterface, it sees the port (COM5) but when I try to connect, it gives me errors, as follows:

Could not connect to COM5 at baudrate 115200:
Serial error: could not open port ‘COM5’: PermissionError(13, ‘Access is denied.’, None, 5)

I’ve tried it with different baud rates from 9600 up. And have set the port properties in device manager to match what I’m using in pronterface, but to no avail.

Anyone tried this before?

The reason I want to test the fan is that recently my prints have become quite hairy, with lots of little hairs all over the finished pieces. Suspect the fan may not be cooling enough.

Cheers,

FP

Probably COM5 is in use by an other process on your system. You can check that by opening a command shell & enter netstat -ano and look for the process-ID that uses COM5. netstat -ano findstr "COM5" might work, too. Look up that process-ID in the task-manager [Ctrl+Shift+Esc] & stop that process. Then COM5 should be available.

1 Like

Hi FP,
i tried Pronterface in order to generate a mesh (as my bed is wraped) - and it worked without a problem - im using a Mac - not sure if that helps - but if you want i can send you a screenshot the next time i connect my printer to my computer!
But: Pronterface works with the Sovol SV06 plus!
Cheers,

Peter

Hi FP,

Not sure about your COM port being busy but some comments on other parts of your post.

You can manually control the part cooling fan from the touch screen interface when you’re not printing very easily.

Choose the middle menu option at the bottom, then chose one of the two temperature options at the top for extruder or bed.

Then in the bottom right corner you will see the fan speed value - just tap on this and enter a value from 0-255 to manually set the fan speed!

Of course this value will be overridden by a print job, it’s mainly for testing purposes.

Regarding Pronterface - I use Octoprint on my SV06 Plus successfully, Pronterface looks like a similar sort of thing. The USB port on the SV06 Plus is just a standard CH340 Serial over USB interface, as long as you have that driver installed on your PC and no other program is using the port it should work.

As for hairy prints (stringing) what kind of filament are you using, what is the recommended temperature range for that filament written on the spool, what temperature are you printing at, and how much retraction do you have set ?

Stringing is heavily dependent on the extruder temperature, filament type and retraction, and somewhat dependent on layer height. Part cooling fan speed has little if anything to do with preventing stringing in my experience.

Usually tuning the extruder temperature and extraction will help a lot. Here is an example of a tricky print I was doing which initially was suffering from pretty bad stringing:

This filament is a special high temperature multi-colour PLA with recommended temperature range of 215C to 235C - quite a bit higher than normal PLA filament.

This initial print attempt used 0.1mm layers, 20% grid infill, 225C extruder temp, 60C bed, 80mm/s print speed, 0.5mm retraction and 100% part fan speed - and came out pretty bad as you can see.

Another issue it was having was the printhead was catching on the jutting angles sometimes. Not enough to knock the print from the base but worrying. I ended up stopping the print due to the stringing.

An article I read suggested “overcooling” when printing fine stems like this can cause warping of the tips of the stems such that the extruder will hit them. It recommended turning the fan off or setting it very low.

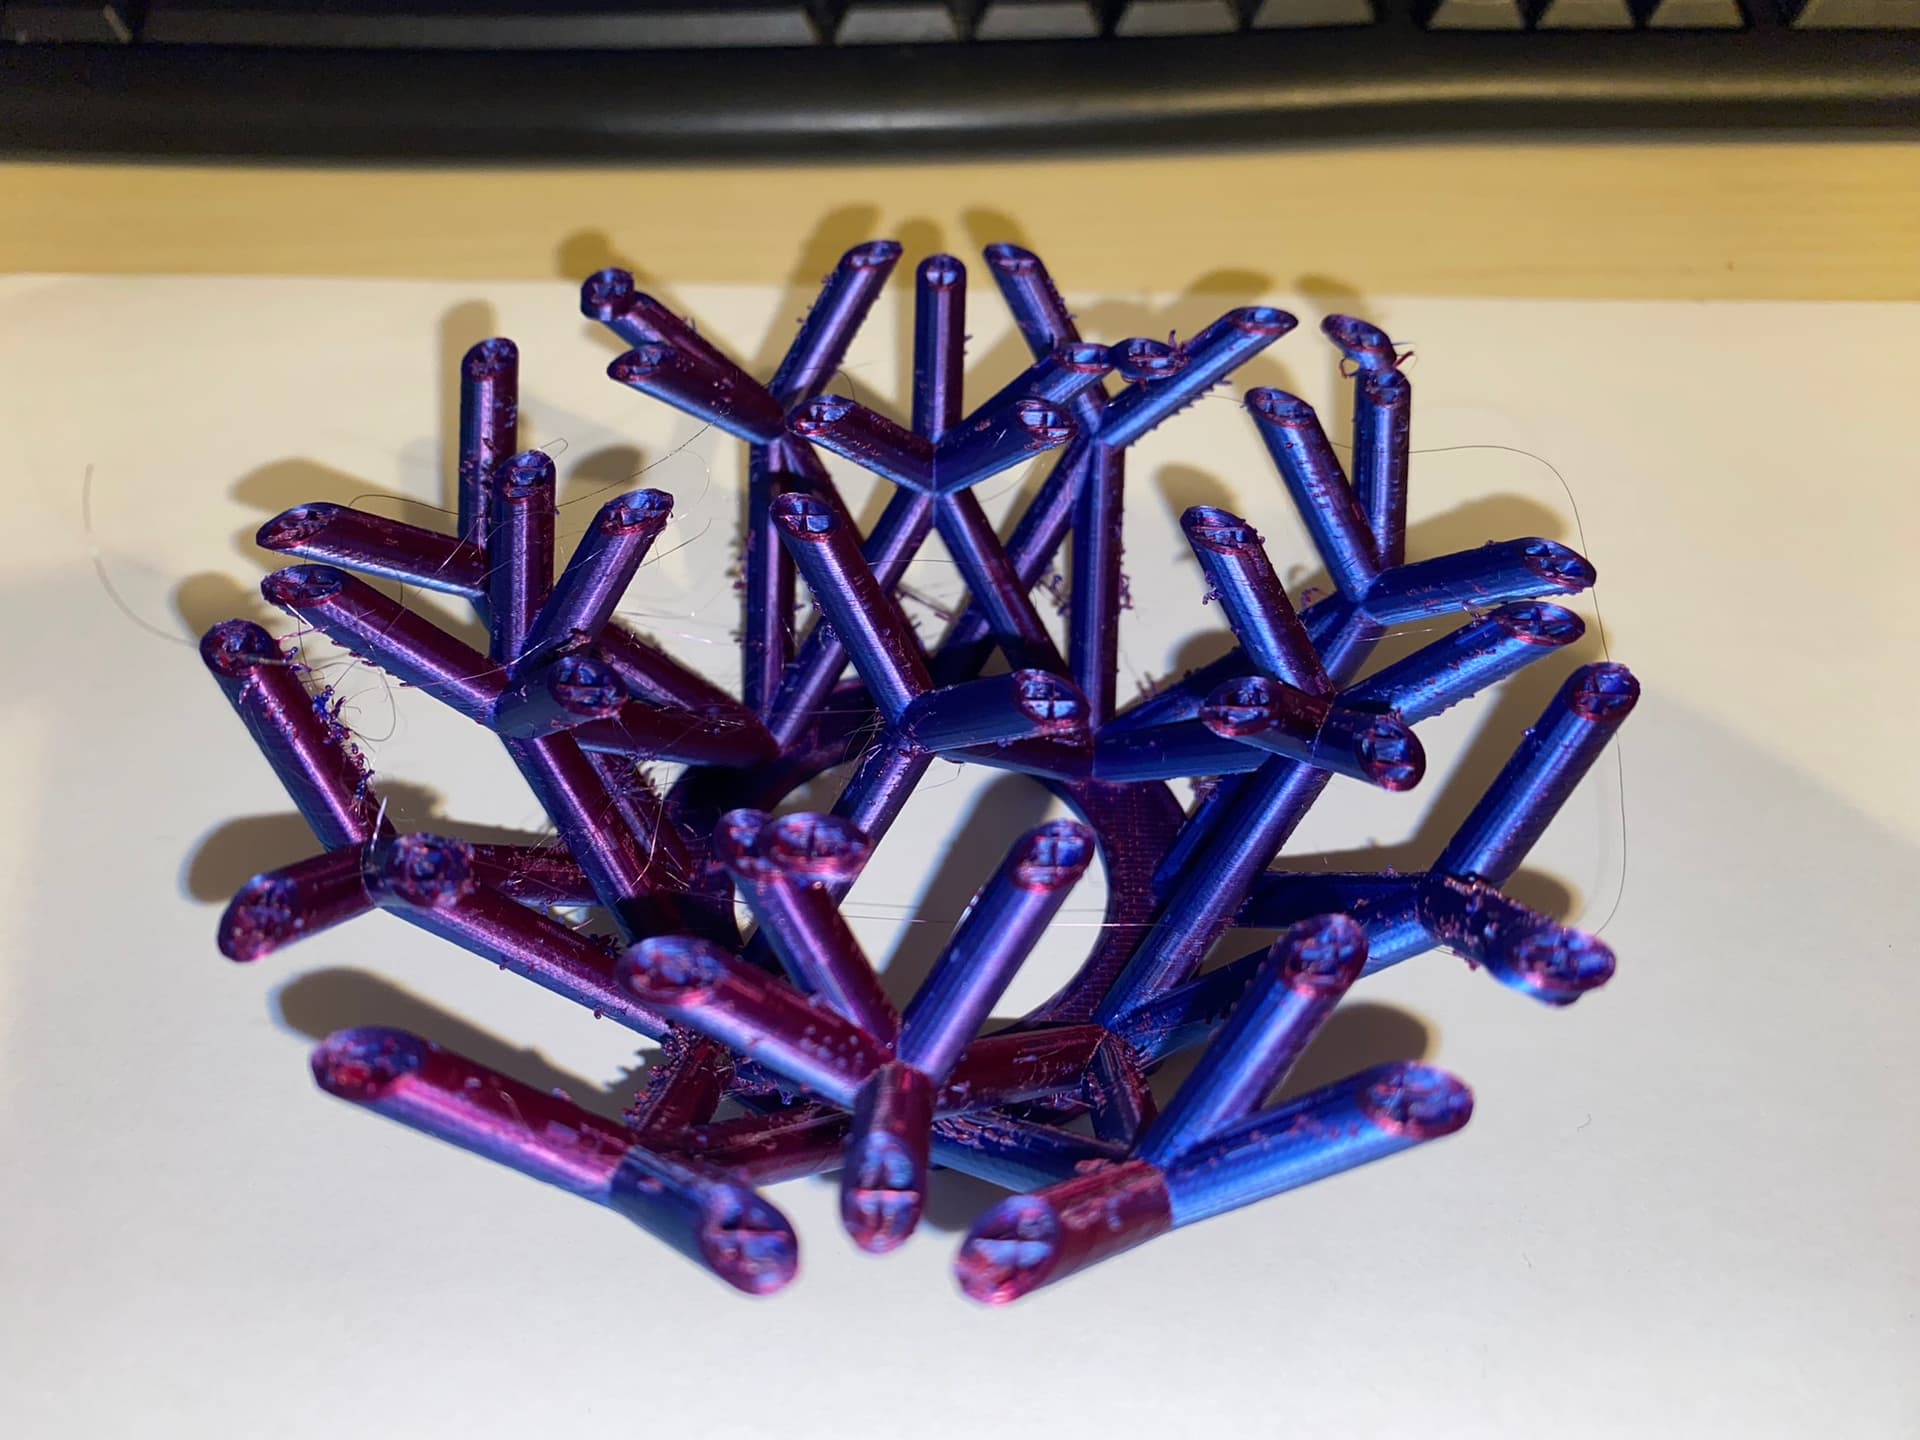
I made a number of changes - my second attempt used 0.2mm layers, (mainly because 0.1mm was taking too long) 0% infill (unnecessary when the entire print is just slanting tubes) I kept the first layer at 225C but printed the remaining layers at only 215C, I increased retraction from 0.5mm to 1mm, and reduced the part fan speed from 100% to 20%. This was the result, almost perfect until a power cut put an end to the print job soon before completion:

There was no catching of the extruder nozzle against the tips of the printed tubes this time - I think this was a combination of reducing the part cooling fan to 20% to reduce warping of the tips as recommended in the article I read, and increasing the layer height to 0.2mm. (Putting the extruder 0.2mm away each time it starts a new layer instead of 0.1mm)

Stringing is caused by uncontrollable oozing of filament - which happens at higher temperatures. If the extruder is too hot filament will ooze out even though the extruder tries to retract the filament, so a fine string of filament oozes out as the print head travels through mid air.

Depending on what filament you’re using and what temperature you’re using I would start by dropping the extruder temp by 5C, and possibly by 10C if that’s still within the recommended range for the filament.

If you have to drop it quite a bit it can be beneficial to print the first layer at a higher temperature for good bed adhesion and the remaining layers at the lower temperature to minimise stringing, otherwise you might get poor adhesion of the first layer resulting in the model knocking off the bed during the print.

In Cura this is “Printing Temperature Initial Layer”. In this example I set the initial layer to 225C, (the middle of the recommended range for this filament) and “Printing Temperature” for the other layers to 215C - the minimum recommended for this filament.

Keep in mind printing at a lower temperature reduces layer adhesion and makes a weaker part. If it’s decorative it doesn’t matter but if you’re making something structural a higher print temperature makes a stronger part, so there is a trade off between stringing and strength.

I also increased retraction from 0.5mm to 1mm. 0.5mm is the default and seems OK for many prints, but I found a big improvement by going to 1mm. Sovol don’t recommend using more than 1mm - I haven’t tried more than this.

One thing I’ve learnt is different brands and colours of filament have different optimal temperatures to give good bed adhesion and minimise stringing, don’t just assume that what works for one PLA works for another! The recommended temperature range on the spool is a good and then tune by then. Take notes when you find settings combination that works well for a specific filament.

Note: everything I’ve said above applies to PLA. I have a roll of PETG as well but I’m still very much a learner with that material and am not getting great results yet. The trade off between layer strength and stringing seems to be much more difficult with PETG - I haven’t been able to print anything in PETG that doesn’t have some degree of stringing, and isn’t also weaker than the same print in PLA so I’m still working to understand what I’m doing wrong there…

Edit: Forgot to add that moisture absorbed into the filament during storage can cause stringy prints that are hard to fix - I try to keep mine stored in an air tight container when not used.

@Bjoern - thanks, I guess it’s possible something is using it, but COM5 only shows up when the printer is plugged in, so unless something is hijacking it immediately I don’t think it’s the case. But you never know; I’ll definitely give it a try next time I fire up the printer (at work at the moment).

Cheers,

FP

@Peter_Berlin - LOL, thanks mate, I must be blind, totally missed that one. I’d seen people do it on the SV06 but it has a different control panel. I looked under the advanced settings but couldn’t find it. It was right under my nose all the time :roll_eyes: :man_facepalming:

I did end up writing a small gcode file with some M106 commands (M106 S64 for 1/4 speed, M106 S128 for half speed and M106 S255 for full speed ahead) and was able to verify that the fan is working ok.

Cheers,

FP

@DBMandrake - thanks for that comprehensive write up. It’s interesting that you had the better result with a lower fan speed, when I see a lot of people on YT and other forums saying you need more cooling for less stringing, for example, the 5015 fan upgrade for the SV06/SV06 plus, supposedly gives better cooling and less stringing. I’ve got a 5015 fan but yet to print the duct, as I have to order some PETG.

Anyway, that sort of explains why I was worried about the fan not working. It is working fine (see my previous reply to @Peter_Berlin).

I think it might be the retraction. I started fiddling with the retraction/z-hop values after a long print crapped out 12 hours in - I could hear the nozzle hitting the print piece as it was moving, occasionally, but I let it run, as the print was huge and well-anchored to the bed. However, on one side it was building supports, and then started printing the piece on top of the supports. All seemed to be going fine, I went away for about half an hour, came back and found that the support had been knocked off and there was filament all over the place. Abort. :face_with_symbols_over_mouth:

I’ve been using the Sovol Cura, version 1.5.7 which is available to download from their website. I’d been setting retraction on and z-hop when retracted on as well. But it still seemed like the nozzle was hitting the print piece at times. So I un-hid some of the settings and lo and behold, when you set z-hop, there’s no default distance, so looked to me like it wasn’t doing a z-hop at all. So I set a distance of 2mm and ran a new print (of something else, I still haven’t worked up the courage to re-start the one that aborted :-)). This is where I started seeing lots of hair. I also set the parameters for not traversing over the print and not traversing over supports. And slowed the speed down as well. So I was quite surprised about the amount of hairy bits. And that started me down the cooling road.

I’ve been using “Tecor” brand PLA+ from InkStation in Australia. Not sure if it’s a good brand or what, it was just what they had for sale. It’s about $27AUD per kilo. The roll I was using was unsealed just before I printed the piece that was hairy. I guess it could have been poor from the factory. But all the others I’ve used of theirs in the past have been ok, with minimal stringing. I have a dryer, I’ll try drying it before I next print with it. I’ve been using the default heat setting for generic PLA in Sovol Cura of 195/60. The label on the roll says 210 to 235, so maybe I’m not printing hot enough? 195 had been working fine for previous prints.

Anyway, thanks for your explanation, I’ll try some of your suggestions next print. That second image looks great, shame about the power failure. Murpy’s Law. What filament brand is that?

Will update after I’ve tried another print with some of your suggestions.

Cheers,

FP

Hi FP,

I have a 5015 part cooling fan kit from https://www.th3dstudio.com/ but I haven’t got around to fitting it yet.

I found the article where it mentioned cooling speed - not specifically a Sovol printer but still probably relevant:

NOTE: Make sure you rule out the print curling up and hitting the nozzle. This can happen if you are over-cooling your print and/or you are printing a material (like ABS) that likes to warp as it cools.

I normally print PLA with 100% part cooling fan speed - it’s important for steep over hangs or bridges, which will sag or fail without part cooling, but there are no bridges or overhangs more than 45 degrees in the model I’m trying to print so technically it should be fine without any cooling fan, especially because it takes quite a while for it to go around each stem before it comes back to the same one.

When I’ve tried to print shapes like this with thin stems on my other 3d printer I also had issues with it catching on the pointy tip of the stem - and that doesn’t even have a part cooling fan.

I think the biggest help was to simply change the layer height from 0.1mm to 0.2mm. This is giving an additional 0.1mm clearance between the extruder nozzle and the previous layer each time it passes over the same stem again, so less chance of it catching the tip of the stem.

A 0.1mm layer height can help with extreme layer overhangs, but again I don’t have any in this design.

Interesting that you are using Z-hop and seeing stringing - I haven’t tried Z-Hop on the SV06 Plus but I did try it on my previous printer and almost always found that enabling Z-Hop made stringing worse. I think most people don’t recommend using Z-Hop except in very specific circumstances. It slows the print job down massively as well. To be honest I wouldn’t use Z-Hop.

Likewise with the parameters not to traverse over the print or supports - when the nozzle stops extruding a tiny bit will dribble out - if you traverse over the part it will “wipe” that tiny bit of leakage onto the part whereas if you avoid going across the part that tiny bit of leakage will leak into mid air and cause a string / whisker…

Normally I wouldn’t recommend increasing the print temperature when you’re seeing stringing, but if you’re printing at 195C when the roll says 210-235C then you’re way too low.

The dual colour filament I have is similarly 215-235C, while my plain colours are 195C-225C. Every brand/type seems to be a bit different.

I wonder if by printing at too low a temperature your print is coming out a bit blobby ?

Here’s what I would suggest as a test:

Increase layer height to 0.2mm if you are using 0.1mm. Increase retraction to 1mm if you are using less than this. (Default is 0.5mm) Disable Z-Hop and disable the custom settings to avoid traversing over the print, increase your extruder temperature to 210C, (for this specific 210-235C spool) keep your bed at 60C. Drop the print speed down to 80mm/s if you have it set higher. The chances of knocking the print are much higher at very fast speeds.

It might also be worth switching to the latest version of official Ultimaker Cura - the Sovol Cura is based on an ancient build of the Cura engine, there are a LOT of improvements to how prints are done in later versions of Cura, especially for printing fine details.

Both my printers came with custom versions of Cura based on ancient Cura code bases - one of the first things I did was copy the profiles for the printers over to a real, up to date version of Cura and ditch the custom Cura’s.

It’s very easy to do - basically just install the latest Ultimaker Cura then copy two files over from Sovol Cura’s installation directory to the right location. Let me know if you want more details.

1 Like

Hey @DBMandrake, thanks again for the advice, much appreciated.

I initially was going to buy the duct from TH3D, but balked due to the exhorbitant shipping costs. I bought one of their display kits for the SV06+ due to hearing bad things about the SV06+'s touch screen. The kit was ~$40.00USD but the shipping was $46.00 USD. This turned out to be $141.00 AUD in total. So I figured I’d print the duct myself, as I bought a 5015 with bearings locally for $16.00 AUD. It would appear that TH3D use one of those third party shipping companies that auto-generate and gouge you for international. I’d have been happy with standard/surface shipping but they only offered international priority.

I’ll try your suggestions and report back. But first I need to fix an issue I discovered yesterday with my Z-axis - I’ll start another post later on once I’ve made a small video of the issue to include in the post.

Cheers,

FP.

Hey @DBMandrake, so I tried some of your suggestions. In hindsight, the piece I printed may not have been a good test but anyway…

So I set the temp up to 210 and left the bed at 60. Turned off the avoid settings and z-hop when retracted, set retraction up to 1.0 mm from 0.5, and dropped the movement speed down to 80mm/sec. I left the print speed at 150, as it’s usually when the print head moves that the piece gets knocked off.

I still got some hair, although not as much as the previous couple of prints, but more than what I was getting before. I think I’ll try setting the temp back to 195 and see how that goes, and next time with a taller piece (see photos). I also found that I got some warping on the pointy bits of the parts. I was using Vision Miner Nano glue as well, but they still lifted. I think this might also have to do with the Z offset - it’s usually at -1.85, but after I frigged around with the Z alignment using the soup can method I re-did the auto Z align and this time for some reason I had to drop the offset to -1.50. This may have been due to the fact that there was filament oozing constantly and fouling the piece of paper I was using to test the distance from the nozzle.

But at least the pieces printed ok. I tried putting more Nano under the lifted bits and pressing down on them but that didn’t work. I ended up getting small bits of UHU on a toothpick and putting that under the lifted bits and pressing down… and they stayed down. Talk about PiTA.

Anyway, more testing to do I guess.

Cheers,

Pete


For most PLA+ drop your nozzle temp down to stop string and try to keep retraction around the 0.5mm-. the SOV6+ has a Volcano style hotend so your melt zone is quite large compared to the old V5/V6 i was quite surprised at the difference it makes- if your printing slow (nothing above 80mm/sec) 185deg to 190deg on the hotend is fine and with the planet drive extruder system theres plenty of toque-.

By the looks of your prints you just need to lower the nozzle a little bit more in your Z-Offset settings, its always hard to tell in photos but your “Skirt” is always a good indicator if your printing to high or low- (it should be a little bit squashed)

But if your printing at high speeds 150mm/sec well anything goes, and ignore all above advice-.

PS- Is that Lemmy in your profile pic, lol

Hey @Mindless thanks, I’ll give those settings a try. I had been originally printing at 190 but when I upgraded the Sovol Cura slicer the new default setting for generic PLA was 195, so I left it at that. I’ve been fiddling with the z-axis adjustment but you’re right, it’s definitely better when the skirt is a bit squished. I made the mistake of doing the auto z-axis levelling procedure with filament loaded, and it was dribbling out the nozzle and interfered with the paper I was using; as a result the offset was too high. Mostly I’ve been printing at 150mm/sec but even though it gives reasonable results I might try slowing it down and see what happens.

Yep, well spotted. I’m a lifelong headbanger :metal:

1 Like

If you use Cura and have it open while trying to connect, you will have issues connecting. I always have to shut down Cura before connecting to my SV06+ w/ pronterface. No issues connecting after that.