Was cleaning my printer up and happened to notice all 8 of the 2.5mm allen screws that hold the hotbed to the z axis screws were loose? Anyone know of general or any specific Sovol Zero guides for regular maintenance? I’ve found some for head checks, belt checks but nothing for common screws to keep a eye on? I’ve done about 500 prints on the printer so far.
Cheers,
Mike
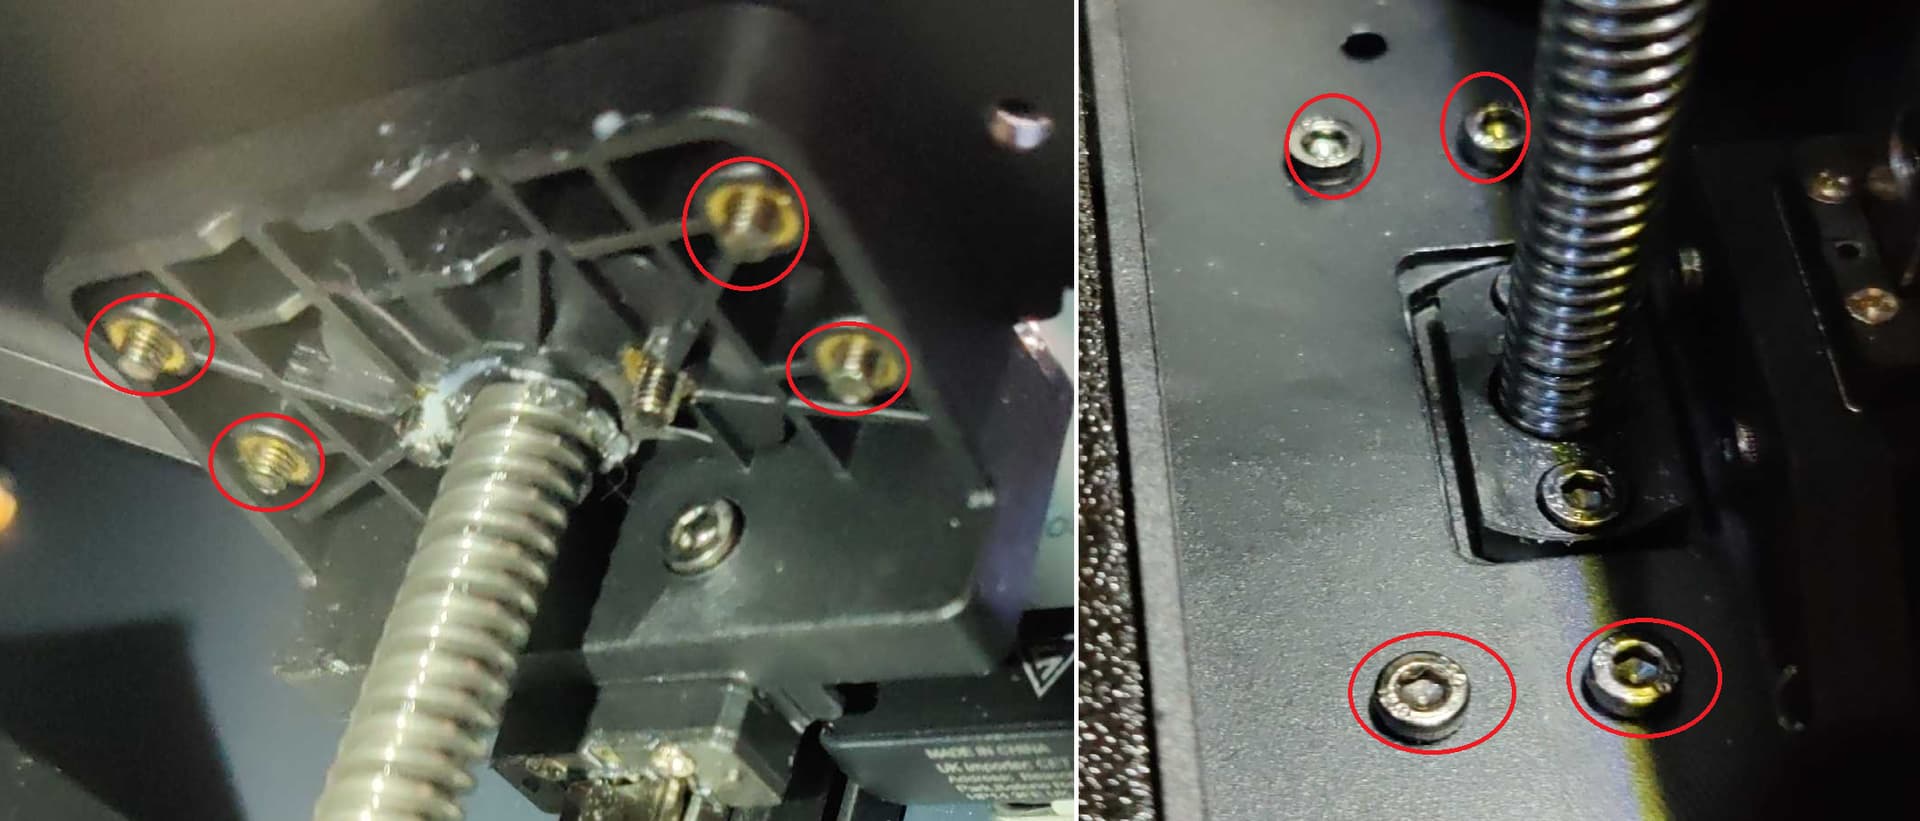
These are the the screws I’m referring to, all four on both sides were loose enough to turn by hand.
Lately I have had some wild prints showing up, some would be fine then a reprint with no changes would just be a train wreck, artifacts, crazy ringing, and what looked like the nozzle actually dragging through the filament. On top of that some prints would make some weird noises as they were printing, and it was not the stepper motors incrementing on tight geometry. So I started to look around again…
Found the next screw loose in case someone else runs into oddities with prints suddenly showing up…
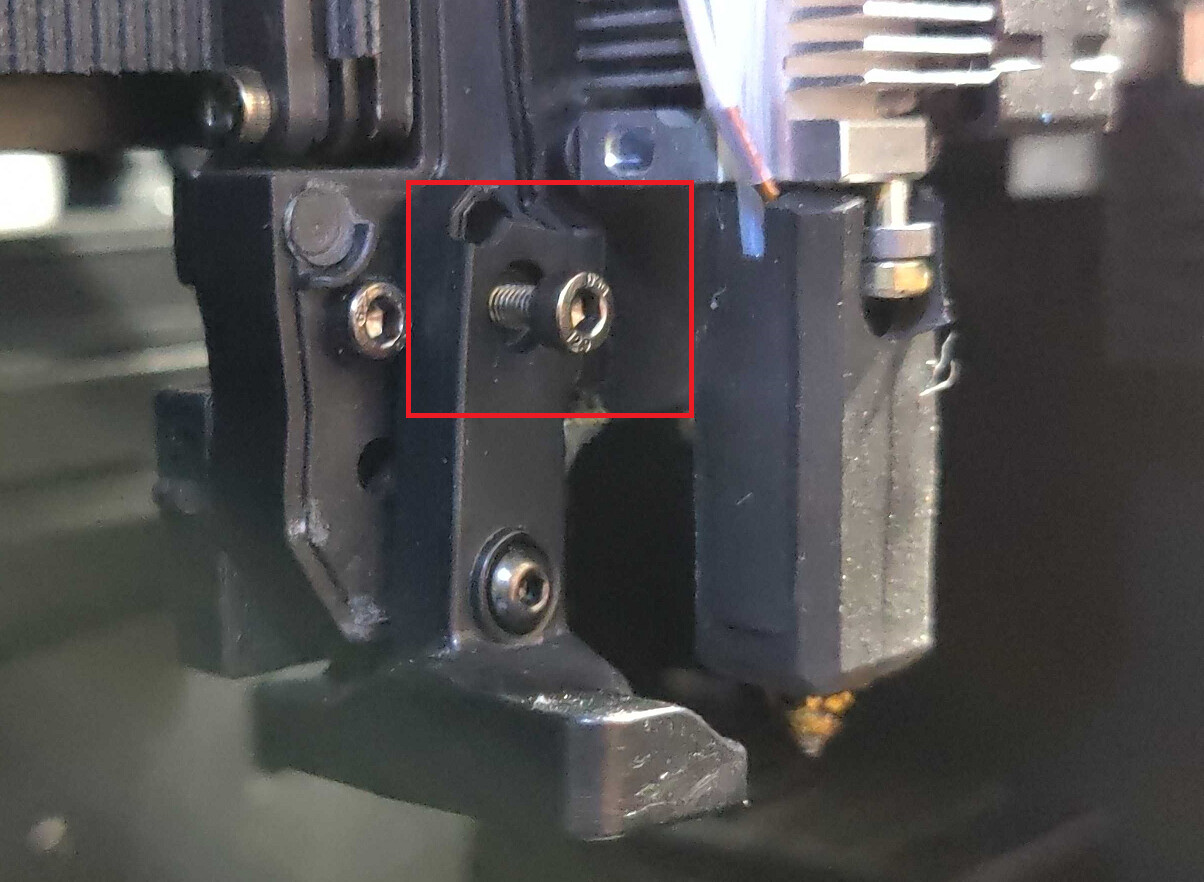
Check screws around your print nozzle the one that holds the eddy sensor to the print head on mine was about to fall out…
Was performing some much past due maintenance on my Sovol Zero. Some updates and adding a few new things I found that may help others if they run into them.
Eddy Sensor Broken
Odd x-axis wear
Loose x-axis Belt Clamp
Glue turning brown (Mentioned by others in other posts)
Tool head cover locking issue
Using cheap 250g filament rolls
Regular maintenance.
I’m still new, well a lot more behind, than others in this forum… I make mistakes printing daily, when I see them, I try to learn and cleanup after them.
As for these posts, I love the Sovol Zero it’s a awesome little printer and as mentioned I unknowingly do bad things to the printer all of the time… Somewhat dated, but like a Timex “It takes a licking and keeps on ticking”… I’m very happy with it the printer, and hey it’s Opensource enough to enjoy
Figured I’d share some recent issues/discoveries below.
Eddy Sensor housing is broken. Above I posted about the eddy sensor screw backing out. I failed to notice the top part of the sensors mount was broken. Today while cleaning I noticed more of the sensors housing was broken. Evidently the plastic does not handle heating and cooling well? For sure it’s structural integrity is compromised captain.
Also note the back part of the sensor (right red square) mount on it’s side to show how it has warped. I’ll be looking into maybe trying to repair the front part of the sensor (left red square) and finding a small lock washer. The sensor has loosened a couple of times since my last post, this could be due to the plastic breaking down and giving out.
Odd x-axis belt wear, have not figured out what is causing it other that the wear lines up perfectly with the respective left and right geared pulleys when the tool head is parked in the home position. It’s hard to see in my images, in person it’s very clear some wear is occurring. I guess right now it’s something to keep a eye on. I know belts eventually need to be replaced, but don’t know how often, I got my printer in March 2025.
Left side belt clamp loose on the tool head, perhaps why I have weird wear on the belt?
Pictures of Belt Clamps: Left side of tool head belt clamp, had a loose screw and odd gap, bottom screw (x-axis belt) was loose enough to twist by hand.
The odd glue turning brown issue, others have reported it here on the forum as well. Connectors seem firmly seated in sockets, just noting the glue does not like the high temps, but things seem ok.
Tool head cover issue, left side is always stubborn about “snapping” into place. Found the reason. A small circular pad that is supposed to be centered over the magnet that the magnet in the cover attaches to was offset half on the wall and half on the magnet. I took a pair of tweezers and moved the pad to the centered position like the others and now the cover clips into place without a problem.
Cheap wet filament, incorrect temps, prototype printing, validating filament settings using PETG and printing prototypes. I’m sure other filament types will have similar issues as well.
My printer runs almost daily ~2-8 or more hours each print. It’s used for either testing new filament or printing prototypes.
Until I am able to dry the filament enough, and dial things in, I run into some very stringy prints. More often than not while tuning those small 250kg cheap rolls of PETG filament. Nightmares are seen here… Shroud fan as well
I learned my lesson, regular maintenance is a good thing! I try to clean once a month, but skipped a monthly cycle over the holidays! and do the above photos show it… Ouch!!! Turn off and unplug the printer! Wear a good mask and turn a fume extractor before trying to clean. Pull the shroud off and take a close look at the tool head, specifically the tool head fans and surrounding areas. The exhaust port and checking the charcoal filter, and cleaning the floor of the print chambers etc…
Happy printing folks, hope these new and updated notes help others that are new to the 3D printer world… Feel free to add on to the list.
Thanks for this excellent maintenance and troubleshooting guide. I have no idea how I missed this thread when it was first posted. Thanks also for posting the link in my thread about the loose Eddy sensor, which was well documented here. When I created the thread, the forum cautioned that there were similar topics already covered, and listed them, but I thought it was a different message and I pressed escape to clear the annoying message just as I realized it was something I should have read. I’d bet this thread was in that list, and I probably should have posted my experience here to affirm and reinforce what you had already posted.
I took your advice and removed the cover on the tool head and used a 2.5 mm hex driver to torque all of the fasteners on the tool head and inside the build chamber. Most of the rail mounting screws were tight, but not all. Almost every other fastener needed 1/8 to 1/4 turn. I wasn’t using a hex key and getting a lot of torque on the long arm to tighten small fasteners almost to their breaking limit. I was using a small Bondus hex driver, similar to a precision screwdriver, with a 16 mm diameter handle that limits the torque. There were many loose fasteners.
The eight build plate mounting screws near the top of the Z axis lead screws were loose, as you described. I know I torqued them when I removed the heated bed so I could shim it level and file off the plastic tab on the front of the build plate frame so I could use generic build plates. I also torqued the four screws (two on each side) on the Z axis lead screw nuts.
The Zero is capable of 4 g acceleration. I don’t run mine hard, but this is a high vibration environment. I might install lock washers where possible, or use some blue Loctite on these fasteners that are loosening during use… at least the ones I don’t anticipate needing to remove.
Another area that warrants routine cleaning is under the heat break fan. Remove the two screws to remove the fan to remove the dust and fibers that accumulate in and on the heat break heat sink to prevent heat from rising and melting filament in the heat break and causing the dreaded heat break clog.
That might be caused by the tool head cable being pinched between the gantry and the left rear pulley block when trying to home? That horrible grinding sound can’t be good for the belts. There isn’t an X or Y belt on a coreXY printer. The two belts are each moving the print head unless it’s traveling along a 45 degree diagonal path.
I don’t use the Bowden tube so my Zero’s tool head cable droops and was causing this problem when trying to home the printer. From your pictures, it looks like your tool head cable is also unsupported. I fixed that problem by 3D printing a cable support that snaps onto the aluminum extrusion where the cable emerges from the back of the printer. I posted a thread with a previous lame attempt to fix this problem. I need to update that thread to show the proper fix, with a link to the STL file.
I’d say its likely where the head is when the printer cools down… since the rubber contracts more than the metal it gets higher tensions and stretches a little.. then we as users tighten it up again later when its running.
Thanks @Liberty4Ever I’ll keep a eye on the cable for signs it’s getting pinched. The tool head cable drooping has been getting worse, it’s starting to make me wonder about wire breakage do to the constant movement. To reduce the hanging I was going to use this Sovol Zero PTFE and Umbilical Cable Connector Clip, but found it pulled on the Bowden tube quite a bit and moving the tool head to the extreme’s seemed to restrict movement quite a bit. I will say the clip did fit very nicely between the two cables.
I’ll have to look up the thread you mentioned about the aluminum extrusion support.
Thanks @SheepInACart that didn’t even dawn on me! LOL and I was tightening things due to expansion and contraction! Sometimes…
That is a really good point!
I couldn’t find the lame fix thread I created. Hopefully it was deleted. I just uploaded the proper fix to Printables and created a thread in the Zero forum with a link.
Next set to check, I found four of the gantry screws were loose, the left side you could turn easily with a bit in your fingers, the right side needed to be snugged down. Not sure of the impact while printing, but the tool head and screw ending up above the rail might have a conflict to sort out!
The same rail screws were loose on my high mileage Zero’s X axis gantry. I’ll keep an eye on them and if they work loose again, they’re getting blue Loctite.