Brand new old SV06. Bought it new two-years ago, but just unboxed it.
Purchased new motherboard from Sovol from China a week ago, and it continues to fail the auto level.
My Specs:
Firmware = 1.1.5 ( this came from the factory )
Marlin Version = 2.0.9.2
A) My Z-Axis belt is tight like a guitar string.
B) My stepper motor connectors are all plugged in straight
C) The connectors on the motherboard are plugged in straight
D) The right Y-Axis motor is delayed to start. The old motherboard did the exact same thing
A Youtube of what is going on, and my original motherboard did the same exact same thing as this new motherboard, so the only thing is to down-grade the firmware to 1.1.4 . There are no end-stop micro switches
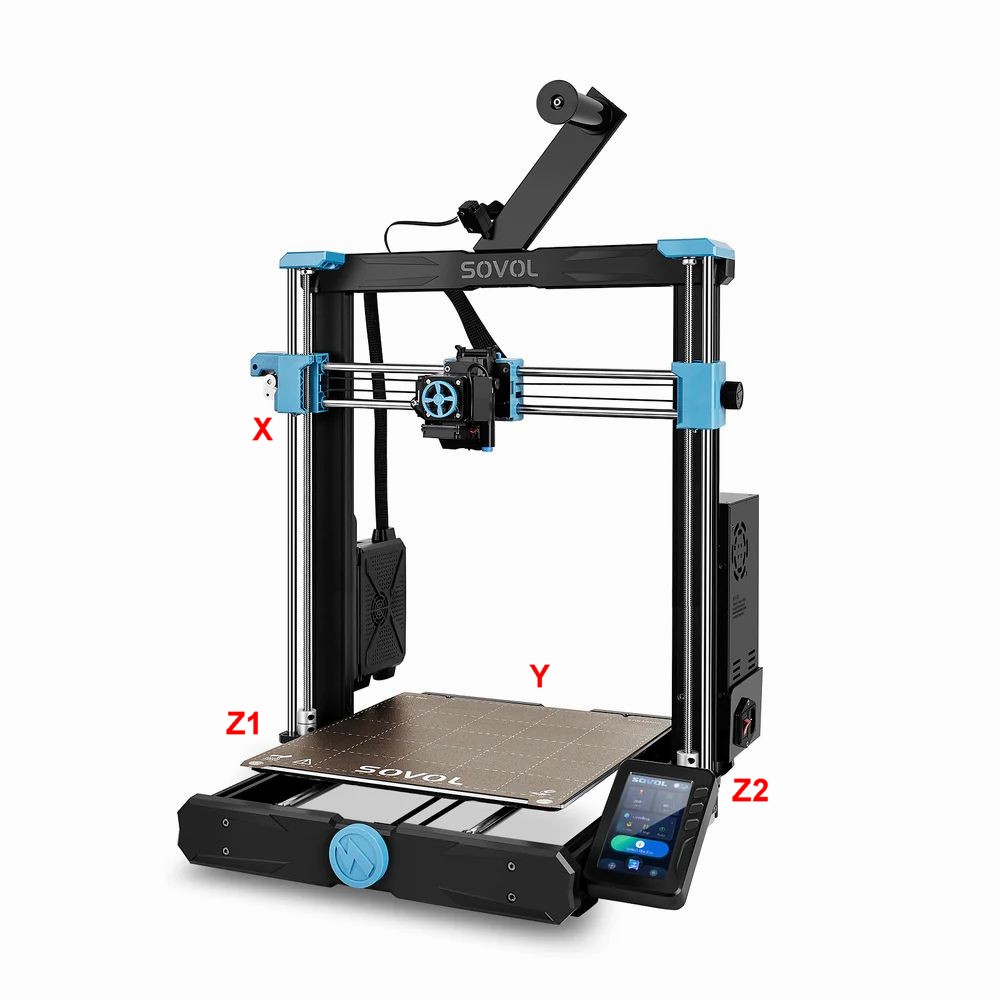
I saw it before, but it didn’t click…your Blue Tape is all wrong.
You have Z where it should by Y & both Y’s should be Z.
The plugs do have little white letters on them.
Problem solved with the bed, and the wires were crossed from the factory, and the motor wires do have the label on them, but I did follow each wire to each motor, and they are correct. The label matches exactly to the PCB and the photo posted.
Now the Z axis motors are doing the buzzing where in the leveling routine
The right Z axis motor moves 2-3cm while the bed moves front to back. Then once the bed centers it self and stops. The left Z axis moves downward 6 or 7cm until it mechanically cannot move because of the angle, and then the buzzing starts, yet the right Z axis motor is not moving. In this state the SV06 has to get turned off.
With the printer off, manually turn the Z steppers until the X axis is pretty much straight.
Then turn on the printer & do Z Align.
It should hit the top, grind for about 3-5 seconds then go all the way down.
You are still cross connected. The X and Y axies should move one at time and the 2 Z motors should move at the same time in the same direction.
The plug on the left Z motor should be on the Y motor behind the center of the bed.
The Motherboard @lion shows only has a single plug for the Z axis. That means the wires from there go to both the Z motors with the screws not the the motors that run belts.
You also have the wrong plug in the right hand Z motor.
Notice the plug at the motherboard for Z has 2 wires on each pin. That is because the 2 Z motors always move at the same time. It is possible the markers at the motor end are incorrect. You MUST get both Z motors to move in sync.
Corrected the wiring as one can see in the video… All I can say is the new board got damaged. The new and the old boards do the same. I installed the old board as it does the same as the new board. The old board has the latest firmware.
Here is the video with the old circuit board…
So my only option is to get ANOTHER board for $30 USD. Do you guys recommend that, or are there any other ideas?
Leave the board wiring alone, don’t touch it.
It looks like the right Z & Y are switched…
Check that the left Z stepper plug is Z1 & the right Z stepper plug is Z2…
If not, change it…post back.
If you can either post some pics or a video showing the white tags at each stepper before you try to run the printer again.
It worked with the old board.performed the auto level.it took me to the second level adjustment screen of Auto Z-Align and Auto Leveling. Those two actions worked too with no problem.
Swapped the cables around
Need to put it through some tests. Print out a Benchy. I guess I need to spin adjust each Z-Axis motor with a Vernier Caliper as right now they are just eye-balled leveled with a wooden ruler-which is NOT precise.
Yes it does compensate as I see the negative on one side and positive on the other. I will break-out the vernier caliper and align each then mechanically and perform the test again.
I reassembled the wiring left the connections in the mother board box with some slack, and cable-tied the cables all around the unit.
I wonder why the display is on the side instead of the front, and power cable coming out 90 degrees out of the power supply. I will mount the touch panel in front past the bed, and get a 90 degree power cord.
Thank you all for your help. I tested it again all re assembled, and it works fine.