It is possible that fine details in the model could be “smoothed” if the shaper is set too aggressively.
From the FAQ section at Klipper
Thank you all, I have some reading for the weekend or hopefully before!
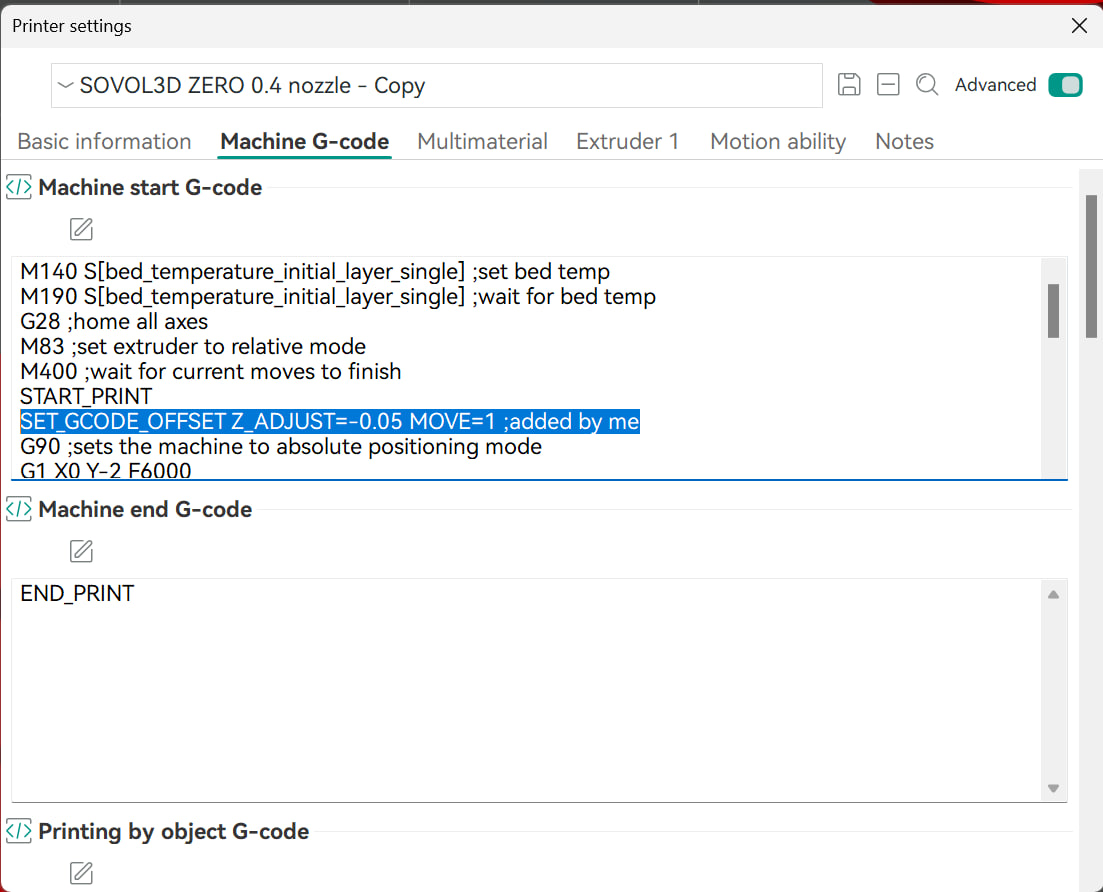
Back on topic. As I was tired to manually set the offset to -0.05 right after bed calibration but having to remember to do it before the extrusion began, and I don’t like useless stress, I fixed that value in the configuration, as a workaround for the Z offset not saved in the printer.
Just add the highlighted string (changing the offset value to suit the one you found is best in your case) to the Machine start G-code in the printer settings and voilà, after automatic bed calibration, the value you’d have to enter manualy each time, from now on will be entered automagically:
Here’s the copypaste-ready version of the string:
SET_GCODE_OFFSET Z_ADJUST=-0.05 MOVE=1
Adjusting internal_endstop_offset didn’t work?
I modified it (from -0.25 to -0.15) and it may have worked indeed, but I have no means to be sure about that because the Z offset displayed in the printer display (or in Mainsail) is anyway always 0.00.
It’s not truly transparent and it leaves me the concern that maybe I’m going too low.
So I resorted to this other method to have more control on it, for example I made a print with 0.08mm layer height instead of the usual 0.20mm, and clearly I did not want -0.05mm Z offset then, but it was all under my eyes (I adjusted it right after automatic bed calibration), if the Z offset wasn’t displayed it would have been harder to handle without possible mistakes.
Have you tried the Eddy Calibrate from the printer display?
I was having these issues as well, trying to adjust the z values that you can in the printer.cfg, but what fixed it was for me was the calibrate. I missed it because there isn’t a macro for it that you can see in mainsail, so I didn’t think to do that.
After emailing support about this they suggested that, and after that I’ve had great first layers.
I think the bed pressure sensor basically gave it the number that it gets from eddy calibrate. That’s what it saves, and then ignores the ‘normal’ Z jogs you can do from the webpage.
Load and unload filament is about the only thing I do at the display, so I didn’t think to try that calibration. It seems to hold for some time, really shouldn’t change unless something gets bumped or actually wears that far..
If Sovol reads this, please expose all the macros from the display in mainsail!
Well, in the past yes, then (after upgrade to 1.4.7) I’m not sure I did it again, as I thought it would be done each time at the beginning of every print anyway.
So I went to do it now and, surprise, the printer won’t do it. It reboots after Z height probe, but it doesn’t scan the whole bed anymore ![]()
Not a macro, but have you noticed the button on (the top-right corner of) the heightmap window?
Anyway, I tried to print a 152.4x152.4x0.2mm block as a first layer test, and with Z offset = 0.000 it completely fails to stick, and only makes a big blob under the nozzle. It kinda work (bad) if I print e.g. in the center of the bed, but for a full surface first layer it is a guaranteed fail, even at slow speed and generous extrusion temperature.
I need to set Z offset to -0.050 mininum to have it adhere, and the bed is clean and has no problems otherwise (with -0.050 or -0.100 it successfully makes a full first layer, the latter value being a bit too aggressive in some zones). Layer height used is the default 0.25mm.
@Fabio - Which firmware are you currently using and what material are you doing these tests with?
Also if you print a 0.2 mm high block with 0.25 mm layer height, does that result in actually a 0.25 mm high block or issues because of the 0.05 difference.
@Vergo << Which firmware are you currently using >>
v1.4.7
<< and what material are you doing these tests with? >>
Currently Sunlu HS PLA (but with slow enough speed where it matters), I tested a full first layer also with PETT and PETG and it didn’t go any better, as could be expected.
<< Also if you print a 0.2 mm high block with 0.25 mm layer height, does that result in actually a 0.25 mm high block or issues because of the 0.05 difference. >>
You mean actual physical height (as measured with a caliper/micrometer) or the sliced g-code?
Anyhow, I can confirm it’s not a slicing issue, but a extrusion one, due to Z height indeed.
Follow up: I’ve done further tests about this, and it definitely works.
Originally it was -0.25 and it was a disaster, I’ve very soon brought it to -0.15 and I was forced to set Z offset to -0.05 as reported. Now I’ve set internal_endstop_offset to -0.10 and resetted Z offset to zero.
Thanks for bringing it out again👍
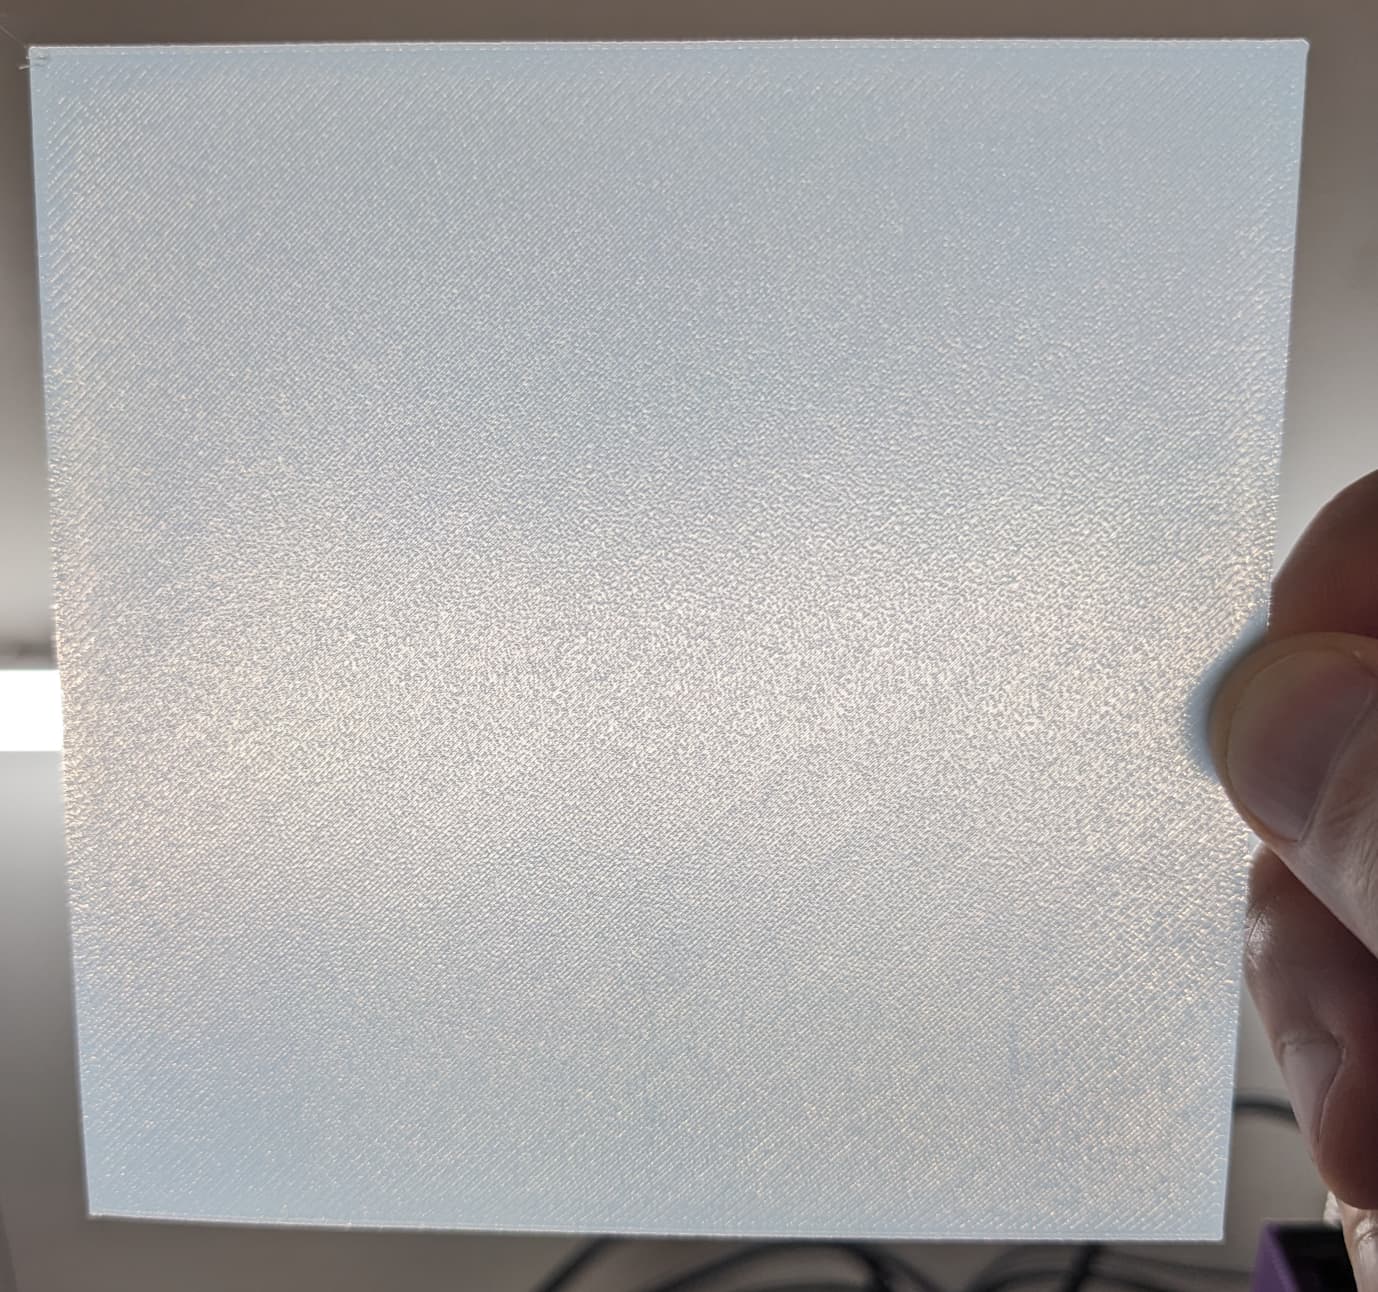
PS: here’s my fresh new first layer, using Z offset 0.00 ![]()
It could be further improved I bet, but not a whole lot. Probably setting Z a bit higher (up to 5 cents) will give better results, but then again I prefer 5 cents more squishy than not, as it should be functionally better, although not aesthetically, and I use the printer to make precise functional prints for now.
By the way, does the magnetic PEI plate enter into the bed leveling measure (thanks to pressure probe or any other alternative means after 1.3.8 firmware)? Because if it’s warped it may contribute maybe enough to problems, and it would be good to know if it’s sensed for or not.
Also, while I haven’t worked much on this field, I think that eddy current sensors, as they exploit Lenz’s law, should be affected by magnets. Maybe Sovol, knowing the position of them, has developed a way to compensate for the magnets, but they will still skew the eddy currents in some way, won’t they?
Yes, BUT
The “calibratre_eddy” routine uses the stepper motor as a micrometer and calibrates your eddy in the exact magnetic environment it is used in. I’m not sure the curve fitting routine used but the result is quite precise once the raw sensor output has been scaled and offset into distance units.
There is some trickery being done since the magnetic mat under the PEI plate does have four holes for the bed screws so that wouldn’t make the magnetic field “flat” around those areas. However, those aren’t visible as far as I can see in the probed values of heightmap.
Shhh, There will be distortions at the edges too but apparently they are too small to “see” at the resolution of the heightmap.
I ended up upgrading to 1.4.7 from 1.3.8 too once I realised that the pressure sensor calibration didn’t provide reproducable enough values between prints. It felt like the variance was something around 0.05 mm, which results in the annoying “sticks well half of the time, not that well sometimes and not at all still far too often”.
In 1.4.7, internal_endstop_offset is by default set to -0.20 (not the -0.25 you’ve mentioned). Testing a one layer PLA print with that value made it clear that’s not the correct value at least for my printer either. Next test with -0.15 looked far more promisintg with only some tiny holes here and there if viewed against a light. Then with -0.10 I finally got the mythical “perfect first layer”. Remains to be seen if the reproducability is there too, but that will require more prints over a longer period of time.
However, 1.4.7 does the nozzle cleanup far worse than 1.3.8. The new logic appears to be to heat the bed first, then bring the nozzle to 200C (at which PLA starts slowly oozing) and then moving the nozzle to touch the bed at X30 Y30. The calibration is done using the eddy sensor even if it’s a touch calibration and I think this part is only for the nozzle cleanup with the side brush. This touching however has the side effect of leaving a PLA blob at that point if there was any oozing. Next comes the brush moves which have been changed to do more moves that previously. Lastly comes the issue that the nozzle is moved back to X30 Y30 for another touch and the cooldown back to 130C. The issue is that the cleaned nozzle has every time during testing collected back the blob that was dropped here before the cleanup so that cleanup end up being for nothing and that blob will move to be part of the print or priming line. Probably all this could be avoided by using a different point instead of the same twice. Going too much closer to X0 Y0 however isn’t likely to be a good idea since that may cause the eddy sensor to be outside the bed plate and not stop the nozzle lowering as a result.
@Fabio - What’s your movement speed for the first layer? If there’s acceleration that can happen then that picture could suggest your pressure advance isn’t optimal as the wrinkles are more visible near the edges.
Yeah, would be nice if there were screws to adjust the tilt of the bed plate as that appears to be the main issue, not warping. Sure, it’s possible to place shims under the 8 screws to adjust the tilt but that’s annoying trial and error, which I anyway ended up doing to get the tilt to be a least little bit less (while still not perfect).
As for how they find Z0 I ASSUME the process is inspired by
How much is copy/paste and how much is new code I have no idea.
By taking the derivative of the position (subtract last value from the current reading) you get a (almost) flat line as long as the eddy is “close” to the plate and coupled to the motor position. When the nozzle touches the plate the eddy speed curve changes drastically while the Z motor continues to turn at the commanded speed. The program watches for the sudden change and assigns the Z counts @ tap as Z0. Note: due to processing delays etc the detection time will be AFTER collision so the algorithm has a built in fudge factor that offsets the result up from the point found.
Sovol is using a modified version of the original probe_eddy_current.py from and I don’t see any obvious copypasta from eddy-ng:
Looks like the SV08MAX version is now public and has the same content as in Zero for z offset calibration:
After verifying when the bed gets touched, it looks like this happens twice during the CLEAN_NOZZLE macro due to RUN_PROBE_VIR_CONTACT being called twice and once during Z_OFFSET_CALIBRATION (“Eddy Calibration”). Regular homing however doesn’t touch the bed. START_PRINT macro calls CLEAN_NOZZLE and then Z_OFFSET_CALIBRATION + other things.
There’s some additional implementation in z_offset_calibration.py which can only be found from Sovol’s repos and it has the logic of doing multiple probes until the deviation between two probes is equal or less than 0.0125 mm after which the last probed value gets accepted as z offset.
X30 Y8 and then after cleaning X30 Y12 was found to provide a better end result.
Side note: printer.cfg has for some reason stepper_x maximum set to 155. Change that to 153 as otherwise the camera can get hit. The OrcaSlicer profile doesn’t anyway allow moves that far in the right front edge.
Note 2: Don’t call RUN_PROBE_VIR_CONTACT twice back to back without first moving Z higher.